Tag: LED Display

Temperature Sensor with Raspberry Pi

Temperature Sensor with Raspberry Pi

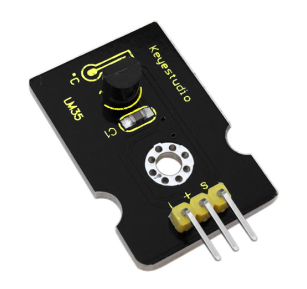
Let’s go over the application of a linear temperature sensor with the Pi. Keyestudio provides the analog LM35 sensor, with a sensitivity of 10 mV per degree Celsius, and a range between 0 and 100 degrees. While primarily designed to take advantage of the Arduino analog input channels, it’s possible to use the LM35 in conjunction with the MCP3008 analog-to-digital converter chip.

The breadboard schematic above illustrates the wiring for the LM35 (using CH0) and the MCP3008. Note that the temperature sensor is connected to the 5V supply voltage as well as the GND GPIO pins of the Raspberry Pi. The Python code below shows a simple application of the temperature sensor in an execution loop. Due to the long response times of this type of sensor, a sampling period of 0.5 seconds is plenty fast.

# Importing modules and classes
import time
import numpy as np
from gpiozero import MCP3008

# Creating ADC channel object for temperature sensor
chtemp = MCP3008(channel=0, clock_pin=11, mosi_pin=10, miso_pin=9, select_pin=8)

# Assigning some parameters
tsample = 0.5  # Sampling period for code execution (s)
tdisp = 1  # Sampling period for value display (s)
tstop = 20  # Total execution time (s)
vref = 3.3  # Reference voltage for MCP3008
ktemp = 100  # Temperature sensor gain (degC/V)

# Initializing variables and starting main clock
tprev = 0
tcurr = 0
tstart = time.perf_counter()

# Execution loop
print('Running code for', tstop, 'seconds ...')
while tcurr <= tstop:
    # Pausing for `tsample`
    time.sleep(tsample)
    # Getting current time (s)
    tcurr = time.perf_counter() - tstart
    # Getting sensor normalized voltage output
    valuecurr = chtemp.value
    # Calculating temperature
    tempcurr = vref*ktemp*valuecurr
    # Displaying temperature every `tdisp` seconds
    if (np.floor(tcurr/tdisp) - np.floor(tprev/tdisp)) == 1:
        print("Temperature = {:d} deg C".format(int(np.round(tempcurr))))
    # Updating previous time value
    tprev = tcurr

print('Done.')
# Releasing GPIO pins
chtemp.close()

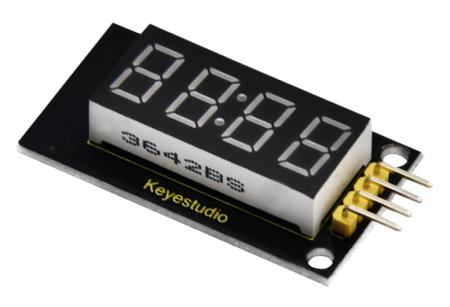
The next piece of code replaces the computer screen display with a 7-segment LED display. It’s a more interesting way to do both the input and output with a Raspberry Pi.

# Importing modules and classes
import time
import numpy as np
import tm1637
from gpiozero import MCP3008

# Creating 4-digit 7-segment display object
tm = tm1637.TM1637(clk=18, dio=17)
# Creating ADC channel object for temperature sensor
chtemp = MCP3008(channel=0, clock_pin=11, mosi_pin=10, miso_pin=9, select_pin=8)

# Assigning some parameters
tsample = 0.5  # Sampling period for code execution (s)
tdisp = 1  # Sampling period for value display (s)
tstop = 20  # Total execution time (s)
vref = 3.3  # Reference voltage for MCP3008
ktemp = 100  # Temperature sensor gain (degC/V)

# Initializing variables and starting main clock
tprev = 0
tcurr = 0
tstart = time.perf_counter()

# Execution loop
print('Running code for', tstop, 'seconds ...')
while tcurr <= tstop:
    # Pausing for `tsample`
    time.sleep(tsample)
    # Getting current time (s)
    tcurr = time.perf_counter() - tstart
    # Getting sensor normalized voltage output
    valuecurr = chtemp.value
    # Calculating temperature
    tempcurr = vref*ktemp*valuecurr
    # Displaying temperature every `tsample` seconds
    tm.temperature(int(np.round(tempcurr)))

print('Done.')
# Clearing display and releasing GPIO pins
tm.write([0, 0, 0, 0])
chtemp.close()

Temperature Sensor Accuracy

What about the accuracy of the LM35 sensor? Luckily enough I do have a LabJack T7 and an actual laboratory grade thermocouple (which has an accuracy of +/- 2 deg. C). At the time of this post, the temperature in my house was 21 deg. Celsius. Using the code above, the LM35 was reading 20 deg. C, while the thermocouple with the LabJack T7 was reading 21 deg. C.

The Python program below shows how to use the LabJack T7 for a simple temperature measurement. You can learn more about using Python to interact with a LabJack T7 here.

Unlike the thermocouple, the LM35 cannot be submerged in an ice bath (approx. 0 deg. C) or boiling water (approx. 100 deg. C), since that would clearly damage its electronic circuitry. Therefore I had to settle with the very unsophisticated measurement of the ambient temperature in my house to compare the two types of sensors.

# Importing modules and classes
import time
import numpy as np
from labjack_unified.devices import LabJackT7

# Creating LabJack object
ljt7 = LabJackT7()
# Assigning `K` type thermocouple to channel AIN0
ljt7.set_TC('AIN0', 'K')
# Assigning some parameters
tsample = 0.5  # Sampling period for code execution (s)
tdisp = 1  # Sampling period for value display (s)
tstop = 20  # Total execution time (s)

# Initializing variables and starting main clock
tprev = 0
tcurr = 0
tstart = time.perf_counter()

# Execution loop
print('Running code for', tstop, 'seconds ...')
while tcurr <= tstop:
    # Pausing for `tsample`
    time.sleep(tsample)
    # Getting current time (s)
    tcurr = time.perf_counter() - tstart
    # Getting current temperature
    tempcurr = ljt7.get_TCtemp()
    # Displaying temperature every `tdisp` seconds
    if (np.floor(tcurr/tdisp) - np.floor(tprev/tdisp)) == 1:
        print("Temperature = {:d} deg C".format(int(np.round(tempcurr))))
    # Updating previous time value
    tprev = tcurr

print('Done.')
# Closing LabJack object
ljt7.close()
7-Segment LED Display with Raspberry Pi

7-Segment LED Display with Raspberry Pi

These types of LED displays are quite popular and can be used to add a visual output to a Raspberry Pi automation project. In this post, I will be talking about the KS0445 4-digit LED Display Module from keyestudio. While keyestudio kits are primarily designed to work with Arduino, they are perfectly suitable for Pi applications.

In theory, any LED 4-digit Display using a TM1637 chip can be used with the Python code that will be shown.

The first step is to install the TM1637 Python package containing the class that will simplify controlling the LED display quite a bit. As a side note, I strongly encourage installing VS Code on the Pi, so you can code like a pro.

Open a terminal window in VS Code and type:

pip install raspberrypi-tm1637

Once the installation is complete, you can wire the display as shown below and try the Python code that follows. It illustrates how straightforward it is to use some of the methods of the TM1637 class that come in the package.

# Importing modules and classes
import tm1637
import time
import numpy as np
from datetime import datetime
from gpiozero import CPUTemperature

# Creating 4-digit 7-segment display object
tm = tm1637.TM1637(clk=18, dio=17)  # Using GPIO pins 18 and 17
clear = [0, 0, 0, 0]  # Defining values used to clear the display

# Displaying a rolling string
tm.write(clear)
time.sleep(1)
s = 'This is pretty cool'
tm.scroll(s, delay=250)
time.sleep(2)

# Displaying CPU temperautre
tm.write(clear)
time.sleep(1)
cpu = CPUTemperature()
tm.temperature(int(np.round(cpu.temperature)))
time.sleep(2)

# Displaying current time
tm.write(clear)
time.sleep(1)
now = datetime.now()
hh = int(datetime.strftime(now,'%H'))
mm = int(datetime.strftime(now,'%M'))
tm.numbers(hh, mm, colon=True)
time.sleep(2)
tm.write(clear)

Raspberry Pi Stopwatch with LED Display

That was pretty much it for the LED display. However, let’s go for an Easter egg, where we implement a stopwatch that can be controlled by keyboard inputs. The main feature here is the use of the Python pynput package, which seamlessly enables non-blocking keyboard inputs. To get started, in a terminal window in VS Code, type:

pip install pynput

To make things more interesting, I created the class StopWatch with the following highlights:

  • First and foremost, could the entire code be written using a function (or a few functions) or even as a simple script? Yes, it could. However, using a class makes for code that is much more modular and expandable, and that can easily be integrated into other code.
  • At the center of the the StopWatch class is the execution loop method. For conciseness and readability, all other methods (with very descriptive names) are called from within this execution loop.
  • The beauty of using a class and therefore its methods is that the latter can be called from different points in the code, as it is the case of the start_watch() method, for example.
  • Finally, as the code is written as a class vs. functions, all the variables can be defined as class attributes. That really reduces complexity with input arguments, if functions were to be used instead.
# Importing modules and classes
import time
import tm1637
import numpy as np
from pynput import keyboard


class StopWatch:
    """
    The class to represent a digital stopwatch.

    **StopWatch** runs on a Raspberry PI and uses a 4-digit 7-segment display
    with a TM1637 control chip.

    The following keyboard keys are used:

        * ``'s'`` to start/stop the timer.
        * ``'r'`` to reset the timer.
        * ``'q'`` to quit the application.

    """
    def __init__(self):
        """
        Class constructor.

        """
        # Creating 4-digit 7-segment display object
        self.tm = tm1637.TM1637(clk=18, dio=17)  # Using GPIO pins 18 and 17
        self.tm.show('00 0')  # Initializing stopwatch display
        # Creating keyboard event listener object
        self.myevent = keyboard.Events()
        self.myevent.start()
        # Defining time control variables (in seconds)
        self.treset = 60  # Time at which timer resets
        self.ts = 0.02  # Execution loop time step
        self.tdisp = 0.1  # Display update period
        self.tstart = 0  # Start time
        self.tstop = 0  # Stop time
        self.tcurr = 0  # Current time
        self.tprev = 0  # Previous time
        # Defining execution flow control flags
        self.run = False  # Timer run flag
        self.quit = False  # Application quit flag
        # Running execution loop
        self.runExecutionLoop()

    def runExecutionLoop(self):
        """
        Run the execution loop for the stopwatch.

        """
        # Running until quit request is received
        while not self.quit:
            # Pausing to make CPU life easier
            time.sleep(self.ts)
            # Updating current time value
            self.update_time()
            # Handling keyboard events
            self.handle_event()
            # Checking if automatic reset time was reached
            if self.tcurr >= self.treset:
                self.stop_watch()
                self.reset_watch()
                self.start_watch()
            # Updating digital display
            self.update_display()
            # Stroing previous time step
            self.tprev = self.tcurr

    def handle_event(self):
        """
        Handle non-blocking keyboard inputs that control stopwatch.

        """
        # Getting keyboard event
        event = self.myevent.get(0.0)
        if event is not None:
            # Checking for timer start/stop
            if event.key == keyboard.KeyCode.from_char('s'):
                if type(event) == keyboard.Events.Release:
                    if not self.run:
                        self.run = True
                        self.start_watch()
                    elif self.run:
                        self.run = False
                        self.stop_watch()
            # Checking for timer reset
            elif event.key == keyboard.KeyCode.from_char('r'):
                if type(event) == keyboard.Events.Release:
                    if not self.run:
                        self.reset_watch()
                    elif self.run:
                        print('Stop watch before resetting.')
            # Checking for application quit
            elif event.key == keyboard.KeyCode.from_char('q'):
                self.quit = True
                self.tm.write([0, 0, 0, 0])
                print('Good bye.')

    def start_watch(self):
        """ Update start time. """
        self.tstart = time.perf_counter()

    def stop_watch(self):
        """ Update stop time. """
        self.tstop = self.tcurr

    def reset_watch(self):
        """ Reset timer. """
        self.tstop = 0
        self.tm.show('00 0')

    def update_time(self):
        """ Update timer value. """
        if self.run:
            self.tcurr = time.perf_counter() - self.tstart + self.tstop

    def update_display(self):
        """ Update digital display every 'tdisp' seconds. """
        if (np.floor(self.tcurr/self.tdisp) - np.floor(self.tprev/self.tdisp)) == 1:
            # Creating timer display string parts (seconds, tenths of a second)
            if int(self.tcurr) < 10:
                tsec = '0' + str(int(self.tcurr))
            else:
                tsec = str(int(self.tcurr))
            ttenth = str(int(np.round(10*(self.tcurr-int(self.tcurr)))))
            # Showing string on digital display
            self.tm.show(tsec + ' ' + ttenth)


# Running instance of StopWatch class
if __name__ == "__main__":
    StopWatch()