Author: Eduardo Nigro

Circular Buffer in Python

Circular Buffer in Python

A circular or ring buffer is a fixed-size data structure that is commonly used in real-time software applications to store a pre-defined number of values. The analogy of a ring with a fixed number of positions is quite useful to capture the FIFO (First-In-First-Out) nature of such data structure. Once the buffer is full, the first element that was written (“In” ) to the buffer is the first one to be overwritten (“Out”) by the next incoming element.

Circular buffers are particularly useful in situations where the data is continuously being sampled and calculations need to be done using a pre-defined sample size or continuous visualization is required.

The two images below represent a circular buffer with 10 positions. On the left, with four elements written to it being 5 the “first in”. On the right, the buffer is full where the value 3 was written. Note how the current write position pointer moves around as new values are added.

Additionally, a ring buffer has basically two states: not-yet- full (left image) and full (right image). The not-yet-full state occurs after the buffer is initialized and exists only until it becomes full. We will see later how this affects the Python code used to represent the buffer.

Once the buffer state changes to full, the FIFO nature of this type of data structure becomes evident. In the next two images, the next element “in” is the value 12, replacing the “first in” value 5, which therefore is the “first out”. The next value “in” is 2, replacing the “second in” value 10, and so on.

In the example figures above, we could imagine the buffer being used to display the average value of its elements (once the buffer reaches the full state). As time progresses, a new sample is written to the buffer, replacing the oldest sample. Each figure of the full buffer is a snapshot at a given time step of the sampling process. In this case the average values are 6.4, 7.1, and 6.3.

Python Implementation

The most elegant way to implement the circular buffer is by using a class. Also, a true circular buffer does not involve shifting its elements to implement the FIFO structure. The current position pointer is used to keep track of where the newest element is.

The circular buffer class should have the following attributes:

  • bufsize: the number of elements that the circular buffer can hold (integer)
  • data: the list of elements, i.e., the buffer itself
  • currpos: the current position pointer (integer)

The class should also have two methods:

  • add(): writes an element to the buffer
  • get(): returns a list containing the buffer elements

Let’s go over some of the features of the Python implementation below:

  • As mentioned earlier, the ring buffer has two states (not-yet-full and full). The first state only exists for a limited time until the buffer is filled up. With that in mind, it makes sense to define the __Full class within the RingBuffer class with the exact same methods. Once the buffer is full, the original class is permanently changed to the full class implementation, with its add() and get() methods now superseding the original ones.
  • The not-yet-full add() method just does a regular list append operation of new elements to the buffer list. It is also in this method that the class is changed to the __Full class once the buffer reaches its capacity.
  • The full add() method, on the other hand, writes the new element at the current (newest) element position and increments the current position by one unit (wrapping it around, or resetting it, once the buffer size value is reached).
  • More interesting however is the full get() method. It splits the data list at the current position into two lists which are then concatenated. The list going from currpos to the last element goes first, then comes the list from the first element to currpos (excluded). By returning this concatenated list, the method fully implements the circular buffer without shifting any of it elements! Inspect the data attribute as you add elements to a full buffer to see what the original list looks like.
class RingBuffer:
    """ Class that implements a not-yet-full buffer. """
    def __init__(self, bufsize):
        self.bufsize = bufsize
        self.data = []

    class __Full:
        """ Class that implements a full buffer. """
        def add(self, x):
            """ Add an element overwriting the oldest one. """
            self.data[self.currpos] = x
            self.currpos = (self.currpos+1) % self.bufsize
        def get(self):
            """ Return list of elements in correct order. """
            return self.data[self.currpos:]+self.data[:self.currpos]

    def add(self,x):
        """ Add an element at the end of the buffer"""
        self.data.append(x)
        if len(self.data) == self.bufsize:
            # Initializing current position attribute
            self.currpos = 0
            # Permanently change self's class from not-yet-full to full
            self.__class__ = self.__Full

    def get(self):
        """ Return a list of elements from the oldest to the newest. """
        return self.data


# Sample usage to recreate example figure values
import numpy as np
if __name__ == '__main__':

    # Creating ring buffer
    x = RingBuffer(10)
    # Adding first 4 elements
    x.add(5); x.add(10); x.add(4); x.add(7)
    # Displaying class info and buffer data
    print(x.__class__, x.get())

    # Creating fictitious sampling data list
    data = [1, 11, 6, 8, 9, 3, 12, 2]

    # Adding elements until buffer is full
    for value in data[:6]:
        x.add(value)
    # Displaying class info and buffer data
    print(x.__class__, x.get())

    # Adding data simulating a data acquisition scenario
    print('')
    print('Mean value = {:0.1f}   |  '.format(np.mean(x.get())), x.get())
    for value in data[6:]:
        x.add(value)
        print('Mean value = {:0.1f}   |  '.format(np.mean(x.get())), x.get())

The output shown next is produced if the code containing the class is executed. The values and the states of the ring buffer shown in the figures at the beginning of the post are recreated in an iterative process that simulates some data acquisition. Note how the ring buffer class changes once the buffer is full.

    <class '__main__.RingBuffer'> [5, 10, 4, 7]
    <class '__main__.RingBuffer.__Full'> [5, 10, 4, 7, 1, 11, 6, 8, 9, 3]

    Mean value = 6.4   |   [5, 10, 4, 7, 1, 11, 6, 8, 9, 3]
    Mean value = 7.1   |   [10, 4, 7, 1, 11, 6, 8, 9, 3, 12]
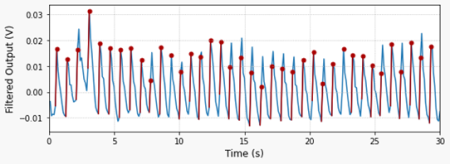
    Mean value = 6.3   |   [4, 7, 1, 11, 6, 8, 9, 3, 12, 2]

As a final remark, in the Pulse Rate Monitor post, the buffer that was used is not a true circular buffer, since the elements in the arrays are shifted by one position for every new value being sampled. Because the buffer is relatively small (200 elements) and the sampling period of the data is reasonably large (0.1s) this solution does not constitute a problem. You can check out the code that implements a true ring buffer for the monitor on my GitHub page.

Pulse Rate Monitor with Raspberry Pi

Pulse Rate Monitor with Raspberry Pi

Pulse rate can be detected using a variety of physical principles. One way of doing it is by applying infrared light to one side of the tip of your finger and sensing the “output” on the other side with a phototransistor. The blood flow through the capillaries at the finger tip fluctuates with the same frequency (rate) of your pulse. That fluctuation can be detected after processing the signal captured by the sensor.

Keyestudio has a rudimentary pulse rate monitor (KS0015) that does the trick. In this post we will go over the signal processing and how to display the pulse rate in real time. Since the KS0015 outputs an analog signal, it has to be used with the MCP3008 analog-to-digital converter chip, as illustrated in the schematics below.

As noted in previous posts, adopting a reference voltage of 3.3V for the MCP3008 provides the best resolution for the analog-to-digital conversion. The sensor output therefore has to be no greater than 3.3V, which can be achieved by using 3.3 instead of 5V as the supply voltage for the KS0015.

The very first thing to do is to look at the signal coming from the sensor as the tip of my index finger is placed between the IR LED and the phototransistor. The plot on the left can be generated by running the Python code below.

By inspecting the program, the first thing to observe is the sampling period (tsample) of 0.02 s. Since we don’t know much about the signal, it’s always good to start with a smaller value. The second thing is the wait time of 5 seconds before collecting any data. After tinkering around for a bit, I realized that the sensor is very sensitive to finger movements. Therefore, waiting for the signal to “settle down” really helps.

# Importing modules and classes
import time
import numpy as np
import matplotlib.pyplot as plt
from gpiozero import MCP3008


# Defining function for plotting
def make_fig():
    # Creating Matplotlib figure
    fig = plt.figure(
        figsize=(8, 3),
        facecolor='#f8f8f8',
        tight_layout=True)
    # Adding and configuring axes
    ax = fig.add_subplot(xlim=(0, max(t)))
    ax.set_xlabel('Time (s)', fontsize=12)
    ax.grid(linestyle=':')
    # Returning axes handle
    return ax


# Creating object for the pulse rate sensor output
vch = MCP3008(channel=0, clock_pin=11, mosi_pin=10, miso_pin=9, select_pin=8)

# Assigning some parameters
tsample = 0.02  # Sampling period for code execution (s)
tstop = 30  # Total execution time (s)
vref = 3.3  # Reference voltage for MCP3008
# Preallocating output arrays for plotting
t = []  # Time (s)
v = []  # Sensor output voltage (V)

# Waiting for 5 seconds for signal stabilization
time.sleep(5)

# Initializing variables and starting main clock
tprev = 0
tcurr = 0
tstart = time.perf_counter()
# Running execution loop
print('Running code for', tstop, 'seconds ...')
while tcurr <= tstop:
    # Getting current time (s)
    tcurr = time.perf_counter() - tstart
    # Doing I/O and computations every `tsample` seconds
    if (np.floor(tcurr/tsample) - np.floor(tprev/tsample)) == 1:
        # Getting current sensor voltage
        valuecurr = vref * vch.value
        # Assigning current values to output arrays
        t.append(tcurr)
        v.append(valuecurr)
    # Updating previous time value
    tprev = tcurr

print('Done.')
# Releasing GPIO pins
vch.close()

# Plotting results
ax = make_fig()
ax.set_ylabel('Sensor Output (V)', fontsize=12)
ax.plot(t, v, linewidth=1.5, color='#1f77b4')
ax = make_fig()
ax.set_ylabel('Sampling Period (ms)', fontsize=12)
ax.plot(t[1::], 1000*np.diff(t), linewidth=1.5, color='#1f77b4')

Digital Filtering and Pulse Detection

In this stage of the signal processing, let’s put some of the content of previous posts to good use. More specifically digital band-pass filtering and event detection for the pulse signal.

First let’s remove the low and high frequency components of the signal that are outside the band of interest. I chose 0.5 and 5 Hz (30 and 300 beats per minute) as the cutoff frequencies. That seems to be a reasonable bandwidth to account for the filter attenuation at the cutoff frequencies, as well as for the human heart “range of operation”.

Then, let’s calculate the derivative of the signal so it’s easier to detect the pulse events. By normalizing the derivative based on its maximum value, the signal amplitude becomes more consistent and therefore a single value threshold can be used. In this case 25% of the maximum value.

The plot on the top shows the normalized derivative of the filtered signal. In red are the trigger events detected by the function find_cluster, which I placed inside the module utils.py . As usual, all the code for this post can be found on my GitHub page.

The plot on the bottom shows the identified trigger events (red dots) displayed on the filtered sensor output signal.

The Python program below is an extension of the one in the previous section, where the digital filter and the trigger detection features are now incorporated. The pulse rate is calculated using the median of the time difference between two consecutive trigger events. In this case, using the median instead of the mean is recommended since it makes the calculation more robust to outliers.

Running the code will generate the two graphs shown above and print the median pulse rate for the corresponding (30-second) data acquisition window. You will notice that the signal amplitude is fairly small (approx. 30 mV) and very sensitive to the finger tip location. It might take a few tries to find the correct position and pressure for the finger.

# Importing modules and classes
import time
import numpy as np
import matplotlib.pyplot as plt
from gpiozero import MCP3008
from utils import find_cluster


# Defining function for plotting
def make_fig():
    # Creating Matplotlib figure
    fig = plt.figure(
        figsize=(8, 3),
        facecolor='#f8f8f8',
        tight_layout=True)
    # Adding and configuring axes
    ax = fig.add_subplot(xlim=(0, max(t)))
    ax.set_xlabel('Time (s)', fontsize=12)
    ax.grid(linestyle=':')
    # Returning axes handle
    return ax


# Creating object for the pulse rate sensor output
vch = MCP3008(channel=0, clock_pin=11, mosi_pin=10, miso_pin=9, select_pin=8)

# Assigning some parameters
tsample = 0.1  # Sampling period for code execution (s)
tstop = 30  # Total execution time (s)
vref = 3.3  # Reference voltage for MCP3008
# Preallocating output arrays for plotting
t = np.array([])  # Time (s)
v = np.array([])  # Sensor output voltage (V)
vfilt = np.array([])  # Filtered sensor output voltage (V)

# Waiting for 5 seconds for signal stabilization
time.sleep(5)

# First order digital band-pass filter parameters
fc = np.array([0.5, 5])  # Filter cutoff frequencies (Hz)
tau = 1/(2*np.pi*fc)  # Filter time constants (s)
# Filter difference equation coefficients
a0 = tau[0]*tau[1]+(tau[0]+tau[1])*tsample+tsample**2
a1 = -(2*tau[0]*tau[1]+(tau[0]+tau[1])*tsample)
a2 = tau[0]*tau[1]
b0 = tau[0]*tsample
b1 = -tau[0]*tsample
# Assigning normalized coefficients
a = np.array([1, a1/a0, a2/a0])
b = np.array([b0/a0, b1/a0])
# Initializing filter values
x = [vref*vch.value] * len(b)  # x[n], x[n-1]
y = [0] * len(a)  # y[n], y[n-1], y[n-2]
time.sleep(tsample)

# Initializing variables and starting main clock
tprev = 0
tcurr = 0
tstart = time.perf_counter()
# Running execution loop
print('Running code for', tstop, 'seconds ...')
while tcurr <= tstop:
    # Getting current time (s)
    tcurr = time.perf_counter() - tstart
    # Doing I/O and computations every `tsample` seconds
    if (np.floor(tcurr/tsample) - np.floor(tprev/tsample)) == 1:
        # Getting current sensor voltage
        valuecurr = vref * vch.value
        # Assigning sensor voltage output to input signal array
        x[0] = valuecurr
        # Filtering signals
        y[0] = -np.sum(a[1::]*y[1::]) + np.sum(b*x)
        # Updating output arrays
        t = np.concatenate((t, [tcurr]))
        v = np.concatenate((v, [x[0]]))
        vfilt = np.concatenate((vfilt, [y[0]]))
        # Updating previous filter output values
        for i in range(len(a)-1, 0, -1):
            y[i] = y[i-1]
        # Updating previous filter input values
        for i in range(len(b)-1, 0, -1):
            x[i] = x[i-1]
    # Updating previous time value
    tprev = tcurr

print('Done.')
# Releasing pins
vch.close()

# Calculating and normalizing sensor signal derivative
dvdt = np.gradient(vfilt, t)
dvdt = dvdt/np.max(dvdt)
# Finding heart rate trigger event times
icl, ncl = find_cluster(dvdt>0.25, 1)
ttrigger = t[icl]
# Calculating heart rate (bpm)
bpm = 60/np.median(np.diff(ttrigger))
print("Heart rate = {:0.0f} bpm".format(bpm))

# Plotting results
ax = make_fig()
ax.set_ylabel('Normalized Derivative ( - )', fontsize=12)
ax.plot(t, dvdt, linewidth=1.5, color='#1f77b4', zorder=0)
for ik, nk in zip(icl, ncl):
    if ik+nk < len(t):
        ax.plot(t[ik:ik+nk], dvdt[ik:ik+nk], color='#aa0000')
ax = make_fig()
ax.set_ylabel('Filtered Output (V)', fontsize=12)
ax.plot(t, vfilt, linewidth=1.5, color='#1f77b4', zorder=0)
for ik, nk in zip(icl, ncl):
    ax.plot(t[ik:ik+nk], vfilt[ik:ik+nk], color='#aa0000')
    ax.scatter(t[ik+1], vfilt[ik+1], s=25, c='#aa0000')

Real-time Pulse Rate Detection

Now that we have the pulse rate detection and calculation working, we can modify the code from the previous section to add the real-time display of the pulse rate. For this step, we will use a 7-segment LED display with a TM1637 chip. In case you don’t have one, all the calls for the tm object in the code below should be removed and a simple

print("Heart rate = {:0.0f} bpm".format(bpm))

can be used to replace the code line

tm.number(int(bpm))

Also, notice how we are using a circular buffer (tbuffer) of 20 seconds that holds the signal for the pulse rate calculation. The buffer is updated every tsample seconds and the actual pulse rate calculation occurs every tdisp seconds. Through comparison with the previous program, you can see how the bpm calculation is now placed inside the execution loop, hence happening in real-time.

# Importing modules and classes
import time
import numpy as np
import matplotlib.pyplot as plt
import tm1637
from gpiozero import MCP3008
from utils import find_cluster


# Defining function for plotting
def make_fig():
    # Creating Matplotlib figure
    fig = plt.figure(
        figsize=(8, 3),
        facecolor='#f8f8f8',
        tight_layout=True)
    # Adding and configuring axes
    ax = fig.add_subplot(xlim=(0, max(t)))
    ax.set_xlabel('Time (s)', fontsize=12)
    ax.grid(linestyle=':')
    # Returning axes handle
    return ax


# Creating object for the pulse rate sensor output and LED display
vch = MCP3008(channel=0, clock_pin=11, mosi_pin=10, miso_pin=9, select_pin=8)
tm = tm1637.TM1637(clk=18, dio=17)

# Assigning some parameters
tsample = 0.1  # Sampling period for code execution (s)
tstop = 60  # Total execution time (s)
tbuffer = 20  # Data buffer length(s)
tdisp = 1  # Display update period (s)
vref = 3.3  # Reference voltage for MCP3008
# Preallocating circular buffer arrays for real-time processing
t = np.array([])  # Time (s)
v = np.array([])  # Sensor output voltage (V)
vfilt = np.array([])  # Filtered sensor output voltage (V)

# Waiting for 5 seconds for signal stabilization
time.sleep(5)

# First order digital band-pass filter parameters
fc = np.array([0.5, 5])  # Filter cutoff frequencies (Hz)
tau = 1/(2*np.pi*fc)  # Filter time constants (s)
# Filter difference equation coefficients
a0 = tau[0]*tau[1]+(tau[0]+tau[1])*tsample+tsample**2
a1 = -(2*tau[0]*tau[1]+(tau[0]+tau[1])*tsample)
a2 = tau[0]*tau[1]
b0 = tau[0]*tsample
b1 = -tau[0]*tsample
# Assigning normalized coefficients
a = np.array([1, a1/a0, a2/a0])
b = np.array([b0/a0, b1/a0])
# Initializing filter values
x = [vref*vch.value] * len(b)  # x[n], x[n-1]
y = [0] * len(a)  # y[n], y[n-1], y[n-2]
time.sleep(tsample)

# Initializing variables and starting main clock
tprev = 0
tcurr = 0
tstart = time.perf_counter()
# Running execution loop
tm.show('Hold')
print('Running code for', tstop, 'seconds ...')
print('Waiting', tbuffer, 'seconds for buffer fill.')
while tcurr <= tstop:
    # Getting current time (s)
    tcurr = time.perf_counter() - tstart
    # Doing I/O and computations every `tsample` seconds
    if (np.floor(tcurr/tsample) - np.floor(tprev/tsample)) == 1:
        # Getting current sensor voltage
        valuecurr = vref * vch.value
        # Assigning sensor voltage output to input signal array
        x[0] = valuecurr
        # Filtering signals
        y[0] = -np.sum(a[1::]*y[1::]) + np.sum(b*x)
        # Updating circular buffer arrays
        if len(t) == tbuffer/tsample:
            t = t[1::]
            v = v[1::]
            vfilt = vfilt[1::]
        t = np.concatenate((t, [tcurr]))
        v = np.concatenate((v, [x[0]]))
        vfilt = np.concatenate((vfilt, [y[0]]))
        # Updating previous filter output values
        for i in range(len(a)-1, 0, -1):
            y[i] = y[i-1]
        # Updating previous filter input values
        for i in range(len(b)-1, 0, -1):
            x[i] = x[i-1]
    # Processing signal in the buffer every `tdisp` seconds
    if ((np.floor(tcurr/tdisp) - np.floor(tprev/tdisp)) == 1) & (tcurr > tbuffer):
        # Calculating and normalizing sensor signal derivative
        dvdt = np.gradient(vfilt, t)
        dvdt = dvdt/np.max(dvdt)
        # Finding heart rate trigger event times
        icl, ncl = find_cluster(dvdt>0.25, 1)
        ttrigger = t[icl]
        # Calculating and displaying pulse rate (bpm)
        bpm = 60/np.median(np.diff(ttrigger))
        tm.number(int(bpm))
    # Updating previous time value
    tprev = tcurr

print('Done.')
tm.show('Done')
# Releasing pins
vch.close()
Python Modules and Packages

Python Modules and Packages

When you start writing more complex code or creating classes and functions that you use all the time, it makes sense to have that code inside a Python module. If you have been following my blog, there are two modules that I created that I use quite often in the examples throughout the posts: gpiozero_extended.py and utils.py. The idea of this post is to give a higher level explanation using some diagrams and simple code. A very complete explanation can be found in the official Python documentation for Modules, from which I quote:

Python has a way to put definitions in a file and use them in a script or in an interactive instance of the interpreter. Such a file is called a module; definitions from a module can be imported into other modules or into the main module.

Furthermore, you can group related modules into a Python package. In general terms, packages reside in your computer as a folder structure with a special file in them. The illustration below shows what a few packages would look like in a folder structure. Notice the __init__.py files in each package folder. Those are required for Python to treat the directories as packages. In the simplest scenario, it can be an empty file. It can also contain initialization code for the package.

Inside each package folder, in addition to the __init__.py file, there are the module files. In the case shown above, package_1 contains module_a.py and module_b.py. Each module can contain any number of classes and/or functions, as well as initialization code.

Let’s create some fictitious modules for package_1 and package_2 containing some empty classes and functions. On a Windows platform, the package folders can be created where your Python applications are kept. Let’s say the folders:

  • C:\Users\myusername\python\mypackages\package_1
  • C:\Users\myusername\python\mypackages\package_2

Just like shown in the illustration above, make sure each package folder has an empty __init__.py file and the following modules files:

"""
This is module_a.py located in package_1.

"""
# Eventual initialization code


# Classes
class MyClassA:
    pass

class MyClassB:
    pass


# Functions
def myfunction_a():
    pass

def myfunction_b():
    pass
"""
This is module_b.py located in package_1.

"""
# Eventual initialization code


# Classes
class MyClassC:
    pass

class MyClassD:
    pass


# Functions
def myfunction_a():
    pass

def myfunction_c():
    pass
"""
This is module_a.py located in package_2.

"""
# Eventual initialization code


# Classes
class MyClassE:
    pass

class MyClassF:
    pass


# Functions
def myfunction_e():
    pass

def myfunction_f():
    pass
"""
This is module_c.py located in package_2.

"""
# Eventual initialization code


# Classes
class MyClassG:
    pass

class MyClassH:
    pass


# Functions
def myfunction_g():
    pass

def myfunction_h():
    pass

PYTHONPATH

Before we can start importing modules and their components, we have to make sure that the mypackages folder can be found by the Python interpreter. One good way to ensure that that is always the case is by adding it to the PYTHONPATH environment variable.

On Windows platforms open the environment variables editor using the search bar. Then, choose the Environment Variables button to access the lists of both user and system variables.

Under the System variables, if there isn’t already a PYTHONPATH variable, create a new one as shown next. Otherwise, you can add the package path to the existing one (separated by a semi-colon).

Importing Classes and Functions

The most elegant way to import classes and functions from a package is by using the dot notation to go directly to the desired component. Once the mypackages folder has been added to the PYTHONPATH, you can try the following imports:

>>> from package_1.module_a import MyClassA
>>> from package_2.module_a import MyClassE

As long as the components being imported have distinct names (MyClassA and MyClassE), different packages can have modules with the same name. As discussed in Classes vs Functions, multiple instances of each class can then be created:

>>> instanceA0 = MyClassA()
>>> instanceA1 = MyClassA()
>>> instanceE0 = MyClassE()

While not customary with classes, sometimes functions are imported under a different (more convenient) name:

>>> from package_2.module_a import myfunction_e as fe
>>> from package_2.module_c import myfunction_g as fg

More on Python Packages

What about the packages that we can install using pip (preferred installer program)? They are also a collection of modules that can help us solve specific problems, neatly organized in self contained distributable packages.

In my case, since I have administrator rights on a Windows platform running Python 3.9, pip installed packages end up in the folder C:\Program Files\Python39\Lib\site-packages. That location is automatically on the Python search path and doesn’t need to be in the PYTHONPATH environment variable. Modules in those packages (such as numpy or scipy) are readily available for imports into your code.

These more professional packages can be found in the PyPi (Python Package Index) public repository. In fact, anyone can create a package and upload it to the PyPi repository. As usual, there is great official documentation on how to distribute your own python modules here. Although the process can be somewhat involved, some time ago I created my own packages (pyev3 and labjack-unified) and added them to the repository!

LED Dimmer with Raspberry Pi

LED Dimmer with Raspberry Pi

In this simple hardware setup, we will explore different coding possibilities using a Raspberry Pi with only a push button and an LED. It will be a good opportunity to compare Python classes vs functions, with code that shows the benefits of the former. More specifically, classes offer modularity and the possibility of reuse through multiple instances.

The diagram shows the very straightforward setup where the button and LED have one of their legs connected to a (distinct) GPIO pin and the other to a ground pin. A 330 Ω resistor must be connected in series with the LED, whose intensity is controlled by a PWM output. That is as simple as it gets.

Note: If the button doesn’t seem to be working, try connecting a different pair of legs, since some of them could be common.

While the dimmer functionality could be achieved using solely electronic circuitry and without a Raspberry Pi, the main point of this post is to explore coding and see what can be done with software!

Let’s start with the requirements of how we want the dimmer to work. By pressing and holding the button, the LED light intensity should increase linearly until reaching its maximum value and then decrease until it reaches its minimum value (LED off). This cycle repeats itself until the button is released, causing the light intensity to stay constant at its last value. By pressing the button again, the cycle resumes from where it stopped.

The plots provide a visual understanding of the requirements. The PWM output controlling the LED intensity ramps up (green) and down (red) while the button is pressed. As it is released, the last PWM output level is then held until the button is pressed again.

In terms of control logic, I use an integer to count ramp transitions. Even values correspond to upward ramps and odd values to downward ramps. Every time the button is released and then pressed again, the counter is reset to zero.

There are two main components in the control logic for the dimmer:

  • The calc_ramp() function that creates the triangular wave output in three steps. 1) Linear output generation, 2) Converting linear output to a tooth saw wave, thus limiting it between 0 and 1, and 3) Flipping odd count sections to generate a triangular wave.
  • Time shifting and counter reset to ensure smooth transitions every time the button is released and then pressed again. When a ramp is interrupted due to a button release event, it it will restart from where it stopped so the effective ramp duration (discounting the elapsed released time) is always the same.

Python Function

The code below shows how the function calc_ramp() and the time shifting are integrated inside an execution loop that controls the LED light intensity. As usual, the interface with the Raspberry Pi is done using GPIO Zero classes, more specifically DigitalInputDevice for the button pin and PWMOutputDevice for the LED pin.

# Importing modules and classes
import time
import numpy as np
from gpiozero import DigitalInputDevice, PWMOutputDevice
from utils import plot_line

# Assigning dimmer parameter values
pinled = 17  # PWM output (LED input) pin
pinbutton = 5  # button input pin
pwmfreq = 200  # PWM frequency (Hz)
pressedbefore = False  # Previous button pressed state
valueprev = 0  # Previous PWM value
kprev = 0  # Previous PWM ramp segmment counter
tshift = 0  # PWM ramp time shift (to start where it left off)
tramp = 2  # PWM output 0 to 100% ramp time (s)
# Assigning execution loop parameter values
tsample = 0.02  # Sampling period for code execution (s)
tstop = 30  # Total execution time (s)

# Preallocating output arrays for plotting
t = [] # Time (s)
value = [] # PWM output duty cycle value
k = [] # Ramp segment counter


def calc_ramp(t, tramp):
    """
    Creates triangular wave output with amplitude 0 to 1 and period 2 x tramp.

    """
    # Creating linear output so the value is 1 when t=tramp
    valuelin = t/tramp
    # Creating time segment counter
    k = t//tramp
    # Shifting output down by number of segment counts
    value = valuelin - k
    # Flipping odd count output to create triangular wave
    if (k % 2) == 1:
        value = 1 - value
    return value, k


# Creating button and PWM output (LED input) objects
button = DigitalInputDevice(pinbutton, pull_up=True, bounce_time=0.1)
led = PWMOutputDevice(pinled, frequency=pwmfreq)

# Initializing timers and starting main clock
tpressed = 0
tprev = 0
tcurr = 0
tstart = time.perf_counter()
# Initializing PWM value and ramp time segment counter
valuecurr = 0
kcurr = -1

# Executing loop
print('Running code for', tstop, 'seconds ...')
while tcurr <= tstop:
    # Executing code every `tsample` seconds
    if (np.floor(tcurr/tsample) - np.floor(tprev/tsample)) == 1:
        # Getting button properties only once
        pressed = button.is_active
        # Checking for button press
        if pressed and not pressedbefore:
            # Calculating ramp time shift based on last PWM value
            if (kprev % 2) == 0:
                tshift = valueprev*tramp
            else:
                tshift = (1-valueprev)*tramp + tramp
            # Starting pressed button timer
            tpressed = time.perf_counter() - tstart
            # Updating previous button state
            pressedbefore = True
        # Checking for button release
        if not pressed and pressedbefore:
            # Storing PWM value and ramp segment counter
            valueprev = led.value
            kprev = kcurr
            # Updating previous button state
            pressedbefore = False
        # Updating PWM output (LED intensity)
        if pressed:
            valuecurr, kcurr = calc_ramp(tcurr-tpressed+tshift, tramp)
            led.value = valuecurr
        # Appending current values to output arrays
        t.append(tcurr)
        value.append(valuecurr)
        k.append(kcurr)
    # Updating previous time and getting new current time (s)
    tprev = tcurr
    tcurr = time.perf_counter() - tstart
print('Done.')
# Releasing pins
led.close()
button.close()

# Plotting results
plot_line([t]*2, [value, k],
        yname=['PWM Output', 'Segment Counter'], axes='multi')
plot_line([t[1::]], [1000*np.diff(t)], yname=['Sampling Period (ms)'])

Python Class

Having the function and the time shifting “mixed” with the code makes for a less clean execution loop section, which can get pretty busy if there are more devices being controlled inside of it. The next piece of code shows how to integrate the two main components of the dimmer control inside a Python class. In addition to removing complexity from the execution loop, it makes it really easy to run multiple dimmers at the same time! This circles back to the modularity that was mentioned at the top of the post. You can create different classes for more complex devices and have them all be part of a module, such as gpiozero_extended.py. In the example below, I create two LED dimmer objects that can be controlled independently.

# Importing modules and classes
import time
import numpy as np
from gpiozero import DigitalInputDevice, PWMOutputDevice


class Dimmer:
    """
    Class that represents an LED dimmer.

    """
    def __init__(self, pinbutton=None, pinled=None):
        # Assigning GPIO pins
        self._pinbutton = pinbutton  # button input pin
        self._pinled = pinled  # PWM output (LED input) pin
        # Assigning dimmer parameter values
        self._pwmfreq = 200  # PWM frequency (Hz)
        self._tshift = 0  # PWM ramp time shift (to start where it left off)
        self._tramp = 2  # PWM output 0 to 100% ramp time (s)
        self._tpressed = 0  # Time button was pressed (s)
        self._tstart = 0  # Starting time of dimmer execution
        self._pressed = False  # Current button pressed state
        self._pressedbefore = False  # Previous button pressed state
        self._valueprev = 0  # Previous PWM value
        self._kcurr = -1  # Current PWM ramp segment counter
        self._kprev = 0  # Previous PWM ramp segmment counter
        # Creating button and PWM output (LED input) objects
        self._button = DigitalInputDevice(self._pinbutton, pull_up=True, bounce_time=0.1)
        self._led = PWMOutputDevice(self._pinled, frequency=self._pwmfreq)

    def _calc_ramp_value(self, t):
        # Creating linear output so the value is 1 when t=tramp
        valuelin = t/self._tramp
        # Creating time segment counter
        self._kcurr = t//self._tramp
        # Shifting output down by number of segment counts
        value = valuelin - self._kcurr
        # Flipping odd count output to create triangular wave
        if (self._kcurr % 2) == 1:
            value = 1 - value
        return value

    def reset_timer(self, tstart):
        # Resets dimmer timer to `tstart`
        self._tstart = tstart

    def update_value(self, t):
        # Getting button properties only once
        self._pressed = self._button.is_active
        # Checking for button press
        if self._pressed and not self._pressedbefore:
            # Calculating ramp time shift based on last PWM value
            if (self._kprev % 2) == 0:
                self._tshift = self._valueprev*self._tramp
            else:
                self._tshift = (1-self._valueprev)*self._tramp + self._tramp
            # Starting pressed button timer
            self._tpressed = time.perf_counter() - self._tstart
            # Updating previous button state
            self._pressedbefore = True
        # Checking for button release
        if not self._pressed and self._pressedbefore:
            # Storing PWM value and ramp segment counter
            self._valueprev = self._led.value
            self._kprev = self._kcurr
            # Updating previous button state
            self._pressedbefore = False
        # Updating PWM output (LED intensity)
        if self._pressed:
            self._led.value = self._calc_ramp_value(t-self._tpressed+self._tshift)

    def __del__(self):
        self._button.close()
        self._led.close()


# Assigning execution loop parameter values
tsample = 0.02 # Sampling period for code execution (s)
tstop = 30 # Total execution time (s)

# Creating dimmer objects
dimmer1 = Dimmer(pinled=17, pinbutton=5)
dimmer2 = Dimmer(pinled=18, pinbutton=6)

# Initializing timers and starting main clock
tprev = 0
tcurr = 0
tstart = time.perf_counter()
# Resettting dimmer timer
dimmer1.reset_timer(tstart)
dimmer2.reset_timer(tstart)

# Executing loop
print('Running code for', tstop, 'seconds ...')
while tcurr <= tstop:
    # Executing code every `tsample` seconds
    if (np.floor(tcurr/tsample) - np.floor(tprev/tsample)) == 1:
        # Updating dimmer outputs
        dimmer1.update_value(tcurr)
        dimmer2.update_value(tcurr)
    # Updating previous time and getting new current time (s)
    tprev = tcurr
    tcurr = time.perf_counter() - tstart
print('Done.')

# Releasing pins
del dimmer1
del dimmer2

If you watch the video, you’ll notice that the light intensity change is not as linear as one would expect, even when the PWM output is. One way to improve this is to add a non-linear transfer function between the ramp function output and the actual PWM set point value.

Also, it would be nice to have the ability to switch the dimmer off by, for instance, pressing and releasing the button for a short period of time. The improved class that does that can be found on my GitHub page.

Curve Fitting with Tangent and Inverse Tangent

Curve Fitting with Tangent and Inverse Tangent

The inverse tangent (arctangent) and tangent functions are quite helpful when it comes to fitting data that characterize the response of some types of sensors. Sensors that transition between two saturation states can have their transfer function (relationship between input and output) represented by the arctangent. The tangent function, on the other hand, comes into play when we need to fit the inverse of the sensor transfer function, with the purpose of linearizing its output in the control software.

Let’s use the Python SciPy package for optimization and root finding, more specifically, the curve_fit function. which is well suited for the case where nonlinear coefficients need to be determined. Convenient forms for data fitting of arctangent and tangent are shown below:

The coefficientsthat produce the best data fit in a least squares sense can be determined using curve_fit. It should be noted that, if you invert the tangent function above, it’s fairly easy to arrive at:

While the fitting problem using the arctangent and tangent functions can be treated completely independently, in some cases, one function does a better job fitting the data than the other one. The coefficient relationships above can be used to go from tangent to arctangent (or vice-versa), when the inverse of the desired function produces a better fit to the (inverted) data than the desired function itself.

Arctangent Function Fit

The following Python code fits data from a photocell sensor as described in Line Tracking Sensor for Raspberry Pi. xdata in the code represents the sensor position in mm, while ydata represents the photocell normalized voltage output.

# Importing modules and classes
import numpy as np
import matplotlib.pyplot as plt
from scipy.optimize import curve_fit

# Defining function to generate Matplotlib figure with axes
def make_fig():
    #
    # Creating figure
    fig = plt.figure(
        figsize=(5, 4.2),
        facecolor='#ffffff',
        tight_layout=True)
    # Adding and configuring axes
    ax = fig.add_subplot(
        facecolor='#ffffff',
        )
    ax.grid(
    linestyle=':',
    )
    # Returning axes handle
    return ax

# Defining parametrized arctangent function
def f(x, k, w, x0, y0):
    return k * np.arctan(w*(x-x0)) + y0

# Defining data points
xdata = [0, 2, 4, 6, 8, 10, 12, 14, 16]
ydata = [0.432, 0.448, 0.477, 0.547, 0.653, 0.800, 0.908, 0.933, 0.955]

# Estimating initial parameter values
p0 = [1, 1]
p0.append(0.5*(max(xdata)+min(xdata)))
p0.append(0.5*(max(ydata)+min(ydata)))
# Fitting data
output = curve_fit(f, xdata, ydata, p0=p0, full_output=True)
# Extracting relevant information from output
copt = output[0]
res = output[2]['fvec']
numeval = output[2]['nfev']
msg = output[3]

# Plotting data and fitted function
xi = np.linspace(min(xdata), max(xdata), 100)
yi = f(xi, *copt)
ax = make_fig()
ax.set_xlabel('x', fontsize=12)
ax.set_ylabel('y', fontsize=12)
ax.scatter(xdata, ydata)
ax.plot(xi, yi, linestyle=':')

# Calculating residual sum of squares (RSS)
rss = np.sum(res**2)
# Calculating root mean squared error (RMSE) from RSS
rmse = np.sqrt(rss/len(ydata))
# Calculating R-square
r2 = 1 - rss/np.sum((ydata-np.mean(ydata))**2)
# Displaying fit info
print('Found solution in {:d} function evaluations.'.format(numeval))
print(msg)
print('R-square = {:1.4f}, RMSE = {:1.4f}'.format(r2, rmse))
print('')
print('Coefficients:')
print('  k  = {:1.3f}'.format(copt[0]))
print('  w  = {:1.3f}'.format(copt[1]))
print('  x0 = {:1.3f}'.format(copt[2]))
print('  y0 = {:1.3f}'.format(copt[3]))

Running the program will generate a plot of the data points with the fitted curve, as well as some statistical information about the fit quality and the optimal coefficients.

Found solution in 43 function evaluations.
Both actual and predicted relative reductions
in the sum of squares are at most 0.000000

R-square = 0.9990, RMSE = 0.0065

Coefficients:
k  = 0.211
w  = 0.377
x0 = 8.565
y0 = 0.701


Tangent Function Fit

The same code can be used to fit a tangent function to a data set. All you need to do is replace the arctangent function with the tangent one and have the appropriate xdata and ydata. In this particular case, the previous data set arrays were just swapped. The program output after the modifications is also shown. The full code can be found on my GitHub repository.

# Defining parametrized tangent function
def f(x, k, w, x0, y0):
    return k * np.tan(w*(x-x0)) + y0

# Defining data points
xdata = [0.432, 0.448, 0.477, 0.547, 0.653, 0.800, 0.908, 0.933, 0.955]
ydata = [0, 2, 4, 6, 8, 10, 12, 14, 16]
Found solution in 54 function evaluations.
Both actual and predicted relative reductions
in the sum of squares are at most 0.000000

R-square = 0.9985, RMSE = 0.1998

Coefficients:
k  = 2.383
w  = 4.896
x0 = 0.696
y0 = 8.377


If we compare the coefficients from the arctangent fit with the ones from the tangent fit, using the relationships derived at the top of the post, they don’t quite match. Even when using the exact same data set by swapping xdata and ydata.

This result shouldn’t be a surprise, since the error between y values and their predictions, used inside the fitting algorithm, are not equivalent even with identical swapped data sets. Additionally, the distribution of the data points among the x coordinates also affects the optimal coefficient values of the fitted function.

Going from Arctangent to Tangent

Let’s take a closer look at the influence of the data point distribution on the resulting fitted function, and when we are better off using the coefficients of the function fitted to the inverse data set.

We want to fit a transfer function to the following data using the tangent function:

# Defining parametrized tangent function
def f(x, k, w, x0, y0):
    return k * np.tan(w*(x-x0)) + y0

# Defining data points
xdata = [0.700, 0.698, 0.691, 0.680, 0.654, 0.587, 0.504, 0.394, 0.341, 0.300, 0.282, 0.275, 0.272]
ydata = [0, 2, 4, 6, 8, 10, 12, 14, 16, 18, 20, 22, 24]

Using the Python program with the code snippet above substituted into it, we get the fit results below. Even though the R-square is a respectable value, the fitted function doesn’t do a good job capturing the transition between the two end states.

Found solution in 80 function evaluations.
Both actual and predicted relative reductions
in the sum of squares are at most 0.000000

R-square = 0.9959, RMSE = 0.4766

Coefficients:
k  = -2.143
w  = 6.469
x0 = 0.485
y0 = 12.382


Due to the overall shape of the transfer function and the fact that the data was originally collected at constant y increments, there is a high concentration of points along the x axis on both ends of the test data range. That leaves the region of interest (inside the red ellipse) with relatively fewer points, biasing the fitted function towards the low and high x value regions (outside the red ellipse).

One way to tackle this issue is by inverting the data set and using, in this case, the arctangent function:

# Defining parametrized arctangent function
def f(x, k, w, x0, y0):
    return k * np.arctan(w*(x-x0)) + y0

# Defining data points
xdata = [0, 2, 4, 6, 8, 10, 12, 14, 16, 18, 20, 22, 24]
ydata = [0.700, 0.698, 0.691, 0.680, 0.654, 0.587, 0.504, 0.394, 0.341, 0.300, 0.282, 0.275, 0.272]

The new fit is now done with x values that are evenly distributed, removing the bias that occurred when the tangent function was used.

Found solution in 60 function evaluations.
Both actual and predicted relative reductions
in the sum of squares are at most 0.000000

R-square = 0.9992, RMSE = 0.0049

Coefficients:
k  = -0.164
w  = 0.354
x0 = 12.253
y0 = 0.486


Finally, we can then use the coefficient relationships to go from arctangent, that produces a better overall data fit, to the desired tangent transfer function. The plot below shows the new tangent function in orange (using the arctangent coefficients) in contrast with the original one in blue.

Line Tracking Sensor for Raspberry Pi

Line Tracking Sensor for Raspberry Pi

Robots that can follow a line on the floor (more specifically AGVs – Automated Guided Vehicles) have been around for quite some time now, moving around in factories and warehouses. The most basic ones follow a magnetic embedded tape or an actual line painted on the floor. In this post, we will take a closer look at a sensor whose output is a continuous value that can be used with the Raspberry Pi. There are quite a few so-called line tracking sensors available for the Pi. However, most of them provide a digital output, i.e., they detect whether you are either on (one) or off (zero) the line, putting the burden on the control system that has to deal with only two possible sensor states. A sensor with a continuous output is much more suitable for what is primarily a set-point tracking control problem.

The pictorial representation on the left shows the two electronic components that were used to make the sensor: a white LED (Keyestudio KS0016) and a photocell (KS0028). The former provides a consistent light source and the latter senses the reflected light intensity off the surface the sensor is pointing at.

In you are mounting the two components to a metal bracket, it is VERY IMPORTANT to use an insulator as shown in the picture! Otherwise, you will short the soldered tips on the circuit boards and permanently damage your Raspberry Pi. I used the paper from a cereal box, folded to the desired thickness.

The wiring schematic below shows how the LED and the photocell are integrated with the Raspberry Pi. Since the photocell output is continuous, an MCP3008 analog-to-digital converter chip is also required.

The connection of the LED to the Pi is pretty straightforward, with the signal pin connected to a GPIO pin of your choosing. In my case, I went with pin 18.

Taking a closer look at the MCP3008 connections, I used 3.3V as the reference voltage for the chip (instead of 5V) for a better absolute resolution.

Since both components require a 5V supply voltage, for the KS0028, a voltage divider must be used to bring the maximum photocell output down to 3.3V (or less) before connecting it to the MCP3008. After doing some testing, a 1 kΩ / 4 kΩ split gave me the ratio that best utilized the 3.3V range.

Sensor Characterization

The actual sensor setup is shown next, where I used black electrical tape (approx. 18 mm wide) as the line to be followed. The test procedure for the sensor characterization is illustrated on the right at its initial position (marker 0 on the actual sensor picture) and final position (after moving the bracket in 2 mm steps until reaching 18 mm). As a side note, the LED tip sits at approximately 5 mm above the surface.

The table below shows the normalized sensor output (where 1 would be the reference voltage of 3.3V) for three sets of measurements at 2 mm position increments. Observe that the row at 18 mm was omitted, since its values were basically the same as the row at 16 mm. That means that the sensor was already being exposed to the maximum amount of reflected light off the white surface at 16 mm. Additionally, the sensor placed fully above the black line (position 0) gives the lowest output for the reflected light, which is about 0.43.

Position (mm)Output Meas. 1Output Meas. 2Output Meas. 3Mean Output
00.4380.4320.4270.432
20.4500.4490.4440.448
40.4940.4480.4500.477
60.5480.5440.5480.547
80.6540.6380.6680.653
100.8070.7900.8040.800
120.9150.9050.9040.908
140.9330.9340.9310.933
160.9480.9570.9600.955

The plot on the left shows the bracket position as a function of the sensor output and the fitted cubic polynomial. The plot on the right shows the transfer function that characterizes the sensor, which is basically the fitted polynomial with the appropriate shift and offset.

A few notes on the transfer function:

  • Technically speaking, the sensor transfer function provides the relationship between the physical input (position, in this case) and the sensor output (normalized voltage). In this particular post, I will be calling that one “sensor output function“. The relationship between sensor output and physical input that is to be implemented in code will then be called transfer function.
  • The variability on the sensor output is more likely due to the variability of the position, since eyeballing the exact 2 mm steps when moving the bracket has plenty of uncertainty to it.
  • The transfer function is basically the inverse of the physical sensor output function and would reside inside the software bridging the real world and the control system. Moreover, it linearizes the sensor behavior! For example, if the bracket is at the position 2 mm, the sensor output would be 0.85. However, once that measurement is brought into the control software and input into the transfer function, the output is an estimation of the original position of 2 mm.

The Python code below was used to generate the previous plots and determine the coefficients for the transfer function. The next section shows some polynomial trickery used to calculate the shift and offset for the fitted cubic function, centered around the position at which the LED is right on the transition between the white and black surfaces (the inflection at 0.7).

# Importing modules and classes
import numpy as np
import matplotlib.pyplot as plt
from numpy.polynomial import Polynomial as P

# Defining function to generate Matplotlib figure with axes
def make_fig():
    #
    # Creating figure
    fig = plt.figure(
        figsize=(5, 4.2),
        facecolor='#ffffff',
        tight_layout=True)
    # Adding and configuring axes
    ax = fig.add_subplot(
        facecolor='#ffffff',
        )
    ax.grid(
    linestyle=':',
    )
    # Returning axes handle
    return ax


# Defining data values u (sensor output) and s (bracket position)
# from sensor characterization test
u = [0.432, 0.448, 0.477, 0.547, 0.653, 0.800, 0.908, 0.933, 0.955]
s = [0, 2, 4, 6, 8, 10, 12, 14, 16]

# Fitting 3rd order polynomial to the data
p, stats = P.fit(u, s, 3, full=True)
# Evaluating polynomial for plotting
ui = np.linspace(0.45, 0.95, 100)
si = p(ui)
# Plotting data and fitted polynomial
ax = make_fig()
ax.set_xlabel('Sensor Output (u)', fontsize=12)
ax.set_ylabel('Position (mm)', fontsize=12)
ax.scatter(u, s)
ax.plot(ui, si, linestyle=':')

# Getting polynomial coefficients
c = p.convert().coef
# Calculating coefficients for transfer function
# (shift and offset representation)
k = c[3]
u0 = -c[2]/(3*k)
w = c[1] - 3*k*u0**2
s0 = c[0] + k*u0**3 + w*u0
# Defining transfer function for plotting
stf = k*(ui-u0)**3 + w*(ui-u0)
# Plotting transfer function
ax = make_fig()
ax.set_xlabel('Sensor Output (u)', fontsize=12)
ax.set_ylabel('Transfer Function Output (mm)', fontsize=12)
ax.plot(ui, stf)

# Calculating root mean squared error from residual sum of squares
rss = stats[0]
rmse = np.sqrt(rss[0]/len(s))
# Calculating R-square
r2 = 1 - rss[0]/np.sum((s-np.mean(s))**2)
# Displaying fit info
print('R-square = {:1.3f}'.format(r2))
print('RMSE (mm) = {:1.3f}'.format(rmse))
print('')
print('Shift (-) = {:1.3f}, Offset (mm) = {:1.3f}'.format(u0, s0))

Polynomial Trickery

Let’s see how we can determine the shift and offset of a third order polynomial that is expressed in its most general form:

Due to the nature of the sensor response, it is reasonable to assume that the corresponding polynomial in its shift and offset form is odd (other than the offset term) and can be expressed as:

Both representations have 4 coefficients that need to be determined (or). The polynomial fitting gave us the first set, so we need to determineas a function of. To do so, let’s expand the second polynomial above and regroup its terms in descending powers of x:

Finally, all we have to do is equate (solving for the variables of interest) the corresponding coefficients of the polynomial above with the one at the top of this section:

Which is exactly what’s in the Python code that produced the transfer function for the line tracking sensor.

Sensor Python Class

From a control software standpoint, the best way to use the line tracking sensor with a robot is to package its transfer function inside a class. That way, it’s much easier to get the sensor position reading within a control loop. The Python code below contains the LineSensor class, in which the transfer function can be easily identified. The motor speed control post can be a starting point for a closed-loop control using the PID class. That one and a more complete version of LineSensor can be found in gpiozero_extended.py.

# Importing modules and classes
import time
import numpy as np
from gpiozero import MCP3008, DigitalOutputDevice

class LineSensor:
    """
    Class that implements a line tracking sensor.

    """
    def __init__(self, lightsource, photosensor):
        # Defining transfer function parameters
        self._k = 335.5
        self._w = 5.821
        self._u0 = 0.700
        # Creating GPIOZero objects
        self._lightsource = DigitalOutputDevice(lightsource)
        self._photosensor = MCP3008(
            channel=photosensor,
            clock_pin=11, mosi_pin=10, miso_pin=9, select_pin=8)
        # Turning light source on
        self._lightsource.value = 1

    @property
    def position(self):
        # Getting sensor output
        u = self._photosensor.value
        # Calculating position using transfer function
        return self._k*(u-self._u0)**3 + self._w*(u-self._u0)

    @position.setter
    def position(self, _):
        print('"position" is a read only attribute.')

    def __del__(self):
        self._lightsource.close()
        self._photosensor.close()


# Assigning some parameters
tsample = 0.1  # Sampling period for code execution (s)
tdisp = 0.5  # Output display period (s)
tstop = 60  # Total execution time (s)
# Creating line tracking sensor object on GPIO pin 18 for
# light source and MCP3008 channel 0 for photocell output
linesensor = LineSensor(lightsource=18, photosensor=0)

# Initializing variables and starting main clock
tprev = 0
tcurr = 0
tstart = time.perf_counter()
# Execution loop
print('Running code for', tstop, 'seconds ...')
while tcurr <= tstop:
    # Getting current time (s)
    tcurr = time.perf_counter() - tstart
    # Doing I/O and computations every `tsample` seconds
    if (np.floor(tcurr/tsample) - np.floor(tprev/tsample)) == 1:
        # Getting sensor position
        poscurr = linesensor.position
        #
        # Insert control action here using gpiozero_extended.PID()
        #
        # Displaying sensor position every `tdisp` seconds
        if (np.floor(tcurr/tdisp) - np.floor(tprev/tdisp)) == 1:
            print("Position = {:0.1f} mm".format(poscurr))
    # Updating previous time value
    tprev = tcurr

print('Done.')
# Deleting sensor
del linesensor

Final Remarks

First, it’s important to check how well the transfer function estimates the actual position of the sensor. That can be done by running the code from the previous section placing the bracket at the original test positions.

The graph on the left shows measured values (from the code output) vs. desired values (by moving the bracket onto each test marker). The dashed line represents the 45-degree line on which measured values match actual ones. You can find the code for it here.

The error is more accentuated away from the center, which seems to be where the cubic fit deviates more from the test points.

Second, the ambient light intensity does affect the sensor reading and therefore will compromise the validity of the transfer function. It is important then to determine the transfer function with lighting conditions that represent where the robot will be running. Preferably, with the sensor mounted on the robot!

Finally, for this specific sensor, the width of the line should be about 20 mm. If the line is too thin, or if the robot is moving too fast for the turn it’s supposed to make, the position deviation may exceed the line thickness. In that case, the sensor would again be “seeing” a white surface on the wrong side of the line(!), causing the negative feedback loop of the control system to become a positive one, moving the robot further away from the line.

Band-pass Filter

Band-pass Filter

A band-pass filter attenuates both low and high frequency components of a signal and therefore, as the name suggests, allows for a band of frequencies to pass through. In this post, we will briefly go over an analog implementation of this type of filter by cascading high-pass and low-pass passive analog filters. I will also go through a digital implementation using Python, as seen on the post Joystick with Raspberry Pi.

The RC circuit diagram shows the high- and low-pass filters in a cascaded arrangement. The cutoff frequency (rad/s) for the high-pass is and for the low-pass. In terms of time constants (which will be helpful later with conciseness), we have respectively and .

For example, a band-pass filter with cutoff frequencies of approximately 0.1 and 2 Hz can be realized with, , , and . Or, using time constants, and .

That’s about it for the analog implementation of a first-order band-pass filter. Let’s see how we can derive the digital version of the same filter and have it ultimately implemented in Python code (at the bottom of this post if you want to skip the technical mumbo jumbo).

Continuous Filter

The first step is to come up with a mathematical representation of the band-pass filter in the analog (continuous) domain. More specifically, as already mentioned in the PID tuning post, let’s work with the Laplace transform (or s-domain), which conveniently turns differential equations into much easier to solve polynomial equations.

In the case of the RC circuit for the band-pass filter, we want to find the transfer function between the output voltageand the input voltage. In other words, between the raw and the filtered signals.

The relationships between voltage and current for the resistor and capacitor are given by:

and

In the s-domain, the derivative operatoris “replaced” with the algebraic s operator:

and

The filter can be separated into two filters (a high-pass and a low-pass), where distinct transfer functions betweenand, as well as betweenand , can be derived and then combined.

Solving the system’s first equation (below) for the current and substituting in the second equation gives:

And rearranging as a transfer function:

Solving the system’s first equation (below) for the current and substituting in the second equation gives:

And rearranging like the high-pass case:

Finally, solving the function for the low-pass filter forand substituting the result in the function for the high-pass filter, will lead to the transfer function of the band-pass filter below (also shown in terms of time constants and descending powers of s):

Discrete Filter

The next task is to convert the continuous system to a discrete one. Similarly to the continuous domain, where the derivative operatoris represented by the operator s, the discrete domain has the operator z. (or 1) corresponds to the current time step discrete value, corresponds to the previous value , to the value before the previous one, and so on.

As seen in the post about digital filtering, for a discrete system with sampling period, the derivative of a continuous variable can be approximated by the backward difference below:

And in terms of operators, we can write:

Substituting s in the continuous transfer function for the band-pass filter gives the equation in the z-domain below. Note also that, because we are talking about a filter for any type of signal, the voltages were replaced by more general input and output variables.

Carrying out the math so we can regroup in terms of descending powers of z, and multiplying both top and bottom by, leads to:

We can then rearrange the z transfer function above to resemble a difference equation:

Where:

At last, the equation above can be brought to a more useful difference equation form, by replacing the z operators by their corresponding discrete system values:

Python Code for Band-Pass Filter

The following Python program implements the digital filter with a fictitious signal comprised of three sinusoidal waves with frequencies 0.01, 0.5, and 25 Hz. The low and high cutoff frequencies of the filter are 0.1 and 2 Hz, therefore allowing only the 0.5 Hz component of the original signal to pass through.

By analyzing the code, it is straightforward to identify the filter coefficients determined in the previous section. The difference equation was implemented in the more general form

where the sets of coefficientsandare normalized by the coefficientof the output. This approach allows for any type of digital filter to be used in the code, as long as the normalized coefficients are defined.

# Importing modules and classes
import numpy as np
from utils import plot_line

# "Continuous" signal parameters
tstop = 20  # Signal duration (s)
Ts0 = 0.0002  # Time step (s)
fs0 = 1/Ts0  # Sampling frequency (Hz)
# Discrete signal parameters
tsample = 0.01  # Sampling period for code execution (s)
# Preallocating output arrays for plotting
tn = []
xn = []
yn = []

# Creating arbitrary signal with multiple sine functions
freq = [0.01, 0.5, 25]  # Sine frequencies (Hz)
ampl = [0.4, 1.0, 0.2]  # Sine amplitudes
t = np.arange(0, tstop+Ts0, Ts0)
xs = np.zeros(len(t))
for ai, fi in zip(ampl, freq):
    xs = xs + ai*np.sin(2*np.pi*fi*t)

# First order digital band-pass filter parameters
fc = np.array([0.1, 2])  # Band-pass cutoff frequencies (Hz)
tau = 1/(2*np.pi*fc)  # Filter time constants (s)
# Filter difference equation coefficients
a0 = tau[0]*tau[1]+(tau[0]+tau[1])*tsample+tsample**2
a1 = -(2*tau[0]*tau[1]+(tau[0]+tau[1])*tsample)
a2 = tau[0]*tau[1]
b0 = tau[0]*tsample
b1 = -tau[0]*tsample
# Defining normalized coefficients
a = np.array([1, a1/a0, a2/a0])
b = np.array([b0/a0, b1/a0])
# Initializing filter values
x = np.array([0.0]*(len(b)))  # x[n], x[n-1], x[n-2], ...
y = np.array([0.0]*(len(a)))  # y[n], y[n-1], y[n-2], ...

# Executing DAQ loop
tprev = 0
tcurr = 0
while tcurr <= tstop:
    # Doing I/O computations every `tsample` seconds
    if (np.floor(tcurr/tsample) - np.floor(tprev/tsample)) == 1:
        # Simulating DAQ device signal acquisition
        x[0] = xs[int(tcurr/Ts0)]
        # Filtering signal
        y[0] = -np.sum(a[1::]*y[1::]) + np.sum(b*x)
        # Updating previous input values
        for i in range(len(b)-1, 0, -1):
                x[i] = x[i-1]
        # Updating previous output values
        for i in range(len(a)-1, 0, -1):
                y[i] = y[i-1]
    # Updating output arrays
    tn.append(tcurr)
    xn.append(x[0])
    yn.append(y[0])
    # Incrementing time step
    tprev = tcurr
    tcurr += Ts0

# Plotting results
plot_line(
    [t, tn], [xs, yn], yname=['X Input', 'Y Output'],
    legend=['Raw', 'Filtered'], figsize=(1300, 250)
)

The plot below shows the code output where the low frequency drift and the high frequency noise are almost fully removed from the signal, while the desired component of 0.5 Hz is preserved.

Joystick with Raspberry Pi

Joystick with Raspberry Pi

A two-axis joystick is an input device that can be used to simultaneously control two degrees of freedom of a system, such as roll and pitch on an aircraft, or the X and Y coordinates of a cartesian robot. The Keyestudio KS0008 joystick discussed in this post provides analog signals for the two axis (left-to-right and front-to-back), as well as a digital signal (downward). Like any analog input device used with the Raspberry Pi, the KS0008 requires the MCP3008 analog-to-digital converter chip.

The wiring schematic shows how to connect the joystick to the Pi with the aid of the MCP3008. The analog outputs X and Y are wired to the channels 0 and 1 of the chip. The digital output B can be connected directly to any GPIO pin. In this configuration the KS0008 uses the 3.3V supply voltage. The Python code below samples and displays the three signals in an execution loop.

As a side note, I used the suffix LR (left-to-right) for the joystick’s X axis, and FB (front-to-back) for the Y axis. Mostly to avoid confusion with the digital filter input (X) and output (Y) used later in this post.

# Importing modules and classes
import time
import numpy as np
from gpiozero import MCP3008, DigitalInputDevice

# Creating objects for the joystick outputs
joyLR = MCP3008(channel=0, clock_pin=11, mosi_pin=10, miso_pin=9, select_pin=8)
joyFB = MCP3008(channel=1, clock_pin=11, mosi_pin=10, miso_pin=9, select_pin=8)
joyB = DigitalInputDevice(18)
# Assigning some parameters
tsample = 0.02  # Sampling period for code execution (s)
tdisp = 0.5  # Output display period (s)
tstop = 30  # Total execution time (s)
vref = 3.3  # Reference voltage for MCP3008

# Initializing variables and starting main clock
tprev = 0
tcurr = 0
tstart = time.perf_counter()
# Running execution loop
print('Running code for', tstop, 'seconds ...')
while tcurr <= tstop:
    # Getting current time (s)
    tcurr = time.perf_counter() - tstart
    # Doing I/O and computations every `tsample` seconds
    if (np.floor(tcurr/tsample) - np.floor(tprev/tsample)) == 1:
        # Getting joy stick normalized voltage output
        valLRcurr = joyLR.value
        valFBcurr = joyFB.value
        # Calculating current time raw voltages
        vLRcurr = vref*valLRcurr
        vFBcurr = vref*valFBcurr
        # Getting the Z axis state
        Bcurr = joyB.value
        # Displaying output voltages every `tdisp` seconds
        if (np.floor(tcurr/tdisp) - np.floor(tprev/tdisp)) == 1:
            print("X = {:0.2f} V , Y = {:0.2f} V , B = {:d}".
            format(vLRcurr, vFBcurr, Bcurr))
    # Updating previous time value
    tprev = tcurr

print('Done.')
# Releasing pins
joyLR.close()
joyFB.close()
joyB.close()

The interactive window output in VS Code should look something like what’s shown next. Note that the center position of the joystick outputs approximately half of the 3.3V supply voltage, i.e., 1.65V. Also observe the change in the B digital value as the joystick is pressed.

Running code for 30 seconds ...
X = 1.64 V , Y = 1.64 V , B = 0
X = 3.30 V , Y = 3.30 V , B = 0
X = 3.30 V , Y = 3.08 V , B = 0
X = 1.65 V , Y = 1.65 V , B = 0
X = 1.64 V , Y = 1.65 V , B = 1
X = 1.64 V , Y = 1.64 V , B = 1
X = 1.64 V , Y = 1.64 V , B = 0
X = 1.00 V , Y = 1.64 V , B = 0
X = 0.01 V , Y = 1.64 V , B = 0
X = 0.00 V , Y = 1.64 V , B = 0
X = 1.64 V , Y = 1.64 V , B = 0
X = 1.63 V , Y = 1.35 V , B = 0
X = 1.64 V , Y = 0.00 V , B = 1
X = 1.63 V , Y = 0.00 V , B = 1
X = 1.64 V , Y = 0.00 V , B = 0
X = 1.64 V , Y = 1.64 V , B = 0
...
X = 1.48 V , Y = 0.34 V , B = 0
X = 1.22 V , Y = 0.00 V , B = 0
X = 1.23 V , Y = 0.00 V , B = 0
Done.

Joystick Output Filtering

Eventually, the joystick output signal can be a bit jittery, due to the fact that not all of us are born with perfect control over our thumb motion.

The plot was generated using the Python code below, where a digital low-pass filter with a cutoff frequency of 1Hz was applied to the joystick X and Y output signals. Of course, the cutoff frequency has to be adjusted based on the desired overall system response, which includes what the joystick is controlling.

The outputs were also normalized between -1 and 1. While any transfer function can be designed to map the original 0 to 3.3V range, -1 to 1 seems appropriate if a DC motor is being controlled between full speed reverse and full speed forward.

# Importing modules and classes
import time
import numpy as np
from utils import plot_line
from gpiozero import MCP3008

# Creating ADC channel objects for the joystick inputs
joyLR = MCP3008(channel=0, clock_pin=11, mosi_pin=10, miso_pin=9, select_pin=8)
joyFB = MCP3008(channel=1, clock_pin=11, mosi_pin=10, miso_pin=9, select_pin=8)
# Assigning some parameters
tsample = 0.02  # Sampling period for code execution (s)
tstop = 10  # Total execution time (s)
vref = 3.3  # Reference voltage for MCP3008
# Preallocating output arrays for plotting
t = []  # Time (s)
xLRn = []  # Joy stick X direction output (-1 to 1)
xFBn = []  # Joy stick Y direction output (-1 to 1)
yLRn = []  # Filtered X direction output (-1 to 1)
yFBn = []  # Filtered Y direction output (-1 to 1)

# First order digital low-pass filter parameters
fc = 1  # Filter cutoff frequency (Hz)
tau = 1/(2*np.pi*fc)  # Filter time constant (s)
# Filter difference equation coefficients
a1 = -tau/(tsample+tau)
b0 = tsample/(tsample+tau)
# Initializing filter values
xLR = [joyLR.value]  # x[n]
xFB = [joyFB.value]  # x[n]
yLR = xLR * 2  # y[n], y[n-1]
yFB = yLR * 2  # y[n], y[n-1]
time.sleep(tsample)

# Initializing variables and starting main clock
tprev = 0
tcurr = 0
tstart = time.perf_counter()
# Running execution loop
print('Running code for', tstop, 'seconds ...')
while tcurr <= tstop:
    # Getting current time (s)
    tcurr = time.perf_counter() - tstart
    # Doing I/O and computations every `tsample` seconds
    if (np.floor(tcurr/tsample) - np.floor(tprev/tsample)) == 1:
        # Getting joy stick normalized voltage output
        xLR[0] = joyLR.value
        xFB[0] = joyFB.value
        # Filtering signals
        yLR[0] = -a1*yLR[1] + b0*xLR[0]
        yFB[0] = -a1*yFB[1] + b0*xFB[0]
        # Updating output arrays with normalized output
        t.append(tcurr)
        xLRn.append(-1 + 2*xLR[0])
        xFBn.append(-1 + 2*xFB[0])
        yLRn.append(-1 + 2*yLR[0])
        yFBn.append(-1 + 2*yFB[0])
        # Updating previous filter output values
        yLR[1] = yLR[0]
        yFB[1] = yFB[0]
    # Updating previous time value
    tprev = tcurr

print('Done.')
# Releasing pins
joyLR.close()
joyFB.close()
# Plotting results
plot_line([t]*2, [xLRn, yLRn], yname='X Output', legend=['Raw', 'Filtered'])
plot_line([t]*2, [xFBn, yFBn], yname='Y Output', legend=['Raw', 'Filtered'])

A Note on Joystick Drift

Even though the KS0008 that I used didn’t have a noticeable drift, it is possible that the output values at the “center position” can drift over time. This means that, over time, your system may start moving around, even when it’s supposed to be at rest at the joystick’s “center position”.

One way to address the issue is to use a digital band-pass filter, which attenuates both the low and high frequency content of a signal. Since the lower cutoff frequency will remove the DC component of the signal (the value that is held constant), it has to be chosen carefully depending on the application. If you are controlling an RC car (where there are extended periods of wide-open-throttle conditions), the band-pass filter may start attenuating the WOT value, causing the car to slow down! On the other hand, if you are controlling a drone, where zero-position drifts are highly undesirable, the band-pass filter may be what you need, since there are no extended periods of moving forward-backward or side-to-side.

The following Python program implements a digital first-order band-pass filter for the joystick outputs, with low and high cutoff frequencies respectively of 0.005 and 2 Hz. The plots show the joystick’s X-Y motion traces for 30 seconds, as well as the “center-position” rest case. The latter helps illustrate how the DC component of the signal is almost fully removed.

# Importing modules and classes
import time
import numpy as np
from utils import plot_line
from gpiozero import MCP3008

# Creating ADC channel objects for the joystick inputs
joyLR = MCP3008(channel=0, clock_pin=11, mosi_pin=10, miso_pin=9, select_pin=8)
joyFB = MCP3008(channel=1, clock_pin=11, mosi_pin=10, miso_pin=9, select_pin=8)
# Assigning some parameters
tsample = 0.02  # Sampling period for code execution (s)
tstop = 30  # Total execution time (s)
vref = 3.3  # Reference voltage for MCP3008
# Preallocating output arrays for plotting
t = []  # Time (s)
xLRn = []  # Joy stick X direction output (-1 to 1)
xFBn = []  # Joy stick Y direction output (-1 to 1)
yLRn = []  # Filtered X direction output (-1 to 1)
yFBn = []  # Filtered Y direction output (-1 to 1)

# First order digital band-pass filter parameters
fc = np.array([0.005, 2])  # Filter cutoff frequencies (Hz)
tau = 1/(2*np.pi*fc)  # Filter time constants (s)
# Filter difference equation coefficients
a0 = tau[0]*tau[1]+(tau[0]+tau[1])*tsample+tsample**2
a1 = -(2*tau[0]*tau[1]+(tau[0]+tau[1])*tsample)
a2 = tau[0]*tau[1]
b0 = tau[0]*tsample
b1 = -tau[0]*tsample
# Assigning normalized coefficients
a = np.array([1, a1/a0, a2/a0])
b = np.array([b0/a0, b1/a0])
# Initializing filter values
xLR = [joyLR.value] * len(b)  # x[n], x[n-1]
xFB = [joyFB.value] * len(b)  # x[n], x[n-1]
yLR = [0] * len(a)  # y[n], y[n-1], y[n-2]
yFB = [0] * len(a)  # y[n], y[n-1], y[n-2]
time.sleep(tsample)

# Initializing variables and starting main clock
tprev = 0
tcurr = 0
tstart = time.perf_counter()
# Running execution loop
print('Running code for', tstop, 'seconds ...')
while tcurr <= tstop:
    # Getting current time (s)
    tcurr = time.perf_counter() - tstart
    # Doing I/O and computations every `tsample` seconds
    if (np.floor(tcurr/tsample) - np.floor(tprev/tsample)) == 1:
        # Getting joy stick normalized voltage output
        xLR[0] = joyLR.value
        xFB[0] = joyFB.value
        # Filtering signals
        yLR[0] = -np.sum(a[1::]*yLR[1::]) + np.sum(b*xLR)
        yFB[0] = -np.sum(a[1::]*yFB[1::]) + np.sum(b*xFB)
        # Updating output arrays with normalized output
        # (The filtered values have no DC component)
        t.append(tcurr)
        xLRn.append(-1 + 2*xLR[0])
        xFBn.append(-1 + 2*xFB[0])
        yLRn.append(2*yLR[0])
        yFBn.append(2*yFB[0])
        # Updating previous filter output values
        for i in range(len(a)-1, 0, -1):
            yLR[i] = yLR[i-1]
            yFB[i] = yFB[i-1]
        # Updating previous filter input values
        for i in range(len(b)-1, 0, -1):
            xLR[i] = xLR[i-1]
            xFB[i] = xFB[i-1]
    # Updating previous time value
    tprev = tcurr

print('Done.')
# Releasing pins
joyLR.close()
joyFB.close()
# Plotting results
plot_line([t]*2, [xLRn, yLRn], yname='X Output', legend=['Raw', 'Filtered'])
plot_line([t]*2, [xFBn, yFBn], yname='Y Output', legend=['Raw', 'Filtered'])
Ultrasonic Sensor with Raspberry Pi

Ultrasonic Sensor with Raspberry Pi

An ultrasonic sensor can be used to detect the distance to an obstacle placed in front of it. The HC-SR04 sensor is an affordable option with fairly good accuracy for measurements between a couple of centimeters and a couple of meters. While primarily designed to work with an Arduino, this type of ultrasonic sensor can easily be used with a Raspberry Pi, provided some adjustments to the level of the signal voltage are made.

The wiring schematic above illustrates how to connect the ultrasonic sensor to the Pi. The HC-SR04 works with 5V for the supply voltage as well as for the logic signals Trig (emits ultrasonic sound wave) and Echo (detects reflected sound wave). Since the Raspberry Pi GPIO pins work with 3.3V logic signals, a voltage divider must be used. A 1:2 ratio of the resistors, as shown in the diagram, will do the trick. In my case I used 1 and 2 kΩ respectively. The Trig and (divided) Echo signals can then be connected to any Pi GPIO pins.

Operating principle of the HC-SR04

As mentioned earlier, this ultrasonic sensor has two logic pins that are used to detect the presence of an object:

  • Trigger – When activated by a 10 μs pulse, it emits an 8-pulse train of ultrasonic sound (40 kHz). The 8-pulse pattern is designed to help the receiver better distinguish between the actual signal and ultrasonic ambient noise.
  • Echo – Is used to detect the reflected 8-pulse signal. It transitions from a LOW to a HIGH state as soon as the 8-pulse train is emitted. It remains HIGH until a reflected signal is detected or 38 ms are elapsed (whichever occurs first).

The distance to the obstacle can be determined by measuring the time that the Echo pin remains HIGH, and by knowing that the speed of sound is 343 m/s (at 20 degrees Celsius). The three quantities are related through the equation below, which can be solved for distance. Note that since the sound wave travels to and from the detected obstacle before it gets to the sensor receiver, a factor of 2 appears in front of the distance.

Therefore:

Remember that the Echo signal remains high for about 38 ms. Hence, by using the formula above, an object that is more that about 6.5 m away cannot be accurately detected. In practical terms, the further away the obstacle is, the easier it is for the sensor to get confused with other reflections of the emitted ultrasonic pulse train. If the space that you are trying to navigate is full of hard surfaces at varying relative angles among them (such as a maze), there will be a lot of reflected signals coming from all over! You might stand a chance to be successful if the obstacles are no more than 0.5 m away.

Sensor Interface with Python

The code below shows a very simple class that represents the ultrasonic sensor. By inspecting the code, one should be able to identify the logic to generate the Trigger signal as well as the logic to determine the time that the Echo signal remains HIGH. The formula above is also implemented in the code to calculate the distance to an obstacle.

# Importing modules and classes
import time
from gpiozero import DigitalInputDevice, DigitalOutputDevice

# Defining sensor class
class UltraSonic:
    """
    Simple class that illustrates the ultrasonic sensor operating principle.

    """
    def __init__(self, echo, trigger):
        # Assingning ultrasonic sensor echo and trigger GPIO pins
        self._usoundecho = DigitalInputDevice(echo)
        self._usoundtrig = DigitalOutputDevice(trigger)
        # Assigning speed of sound (cm/s)
        self.speedofsound = 34300

    @property
    def distance(self):
        # Sending trigger pulse (~10 us)
        self._usoundtrig.on()
        time.sleep(0.000010)
        self._usoundtrig.off()
        # Detecting echo pulse start
        while self._usoundecho.value == 0:
            trise = time.perf_counter()
        # Detecting echo pulse end
        while self._usoundecho.value == 1:
            tfall = time.perf_counter()
        # Returning distance (cm)
        return 0.5 * (tfall-trise) * self.speedofsound

    @distance.setter
    def distance(self, _):
        print('"distance" is a read only attribute.')

    def __del__(self):
        self._usoundecho.close()
        self._usoundtrig.close()


# Assigning some parameters
tsample = 1  # Sampling period for code execution (s)
tstop = 10  # Total execution time (s)
# Creating ultrasonic sensor object
usensor = UltraSonic(echo=27, trigger=4)
# Initializing variable and starting main clock
tcurr = 0
tstart = time.perf_counter()

# Execution loop
print('Running code for', tstop, 'seconds ...')
while tcurr <= tstop:
    print('Waiting for sensor...')
    time.sleep(tsample)
    # Getting current time (s)
    tcurr = time.perf_counter() - tstart
    # Displaying measured distance
    print("Distance = {:0.1f} cm".format(usensor.distance))

print('Done.')
# Deleting sensor
del usensor

There is in fact a really good implementation of an ultrasonic sensor class in GPIO Zero. It uses multi-threading to give near instantaneous sensor distance measurements. Additionally, a moving average is used in the measurement calculation to improve the signal-to-noise ratio. The code below shows how simple it is to use the DistanceSensor class.

Observe that the execution portions of the two pieces of code are virtually the same, which illustrates the portability of classes inside a program. Finally, in the examples, I used the GPIO pins 4 and 27 for the Trigger and Echo signals, respectively.

# Importing modules and classes
import time
from gpiozero import DistanceSensor

# Assigning some parameters
tsample = 1  # Sampling period for code execution (s)
tstop = 10  # Total execution time (s)
# Creating ultrasonic sensor object
usensor = DistanceSensor(echo=27, trigger=4, max_distance=2)
# Initializing variable and starting main clock
tcurr = 0
tstart = time.perf_counter()

# Execution loop
print('Running code for', tstop, 'seconds ...')
while tcurr <= tstop:
    print('Waiting for sensor...')
    time.sleep(tsample)
    # Getting current time (s)
    tcurr = time.perf_counter() - tstart
    # Displaying measured distance (with unit conversion)
    print("Distance = {:0.1f} cm".format(100*usensor.distance))

print('Done.')
# Deleting sensor
del usensor
Temperature Sensor with Raspberry Pi

Temperature Sensor with Raspberry Pi

Let’s go over the application of a linear temperature sensor with the Pi. Keyestudio provides the analog LM35 sensor, with a sensitivity of 10 mV per degree Celsius, and a range between 0 and 100 degrees. While primarily designed to take advantage of the Arduino analog input channels, it’s possible to use the LM35 in conjunction with the MCP3008 analog-to-digital converter chip.

The breadboard schematic above illustrates the wiring for the LM35 (using CH0) and the MCP3008. Note that the temperature sensor is connected to the 5V supply voltage as well as the GND GPIO pins of the Raspberry Pi. The Python code below shows a simple application of the temperature sensor in an execution loop. Due to the long response times of this type of sensor, a sampling period of 0.5 seconds is plenty fast.

# Importing modules and classes
import time
import numpy as np
from gpiozero import MCP3008

# Creating ADC channel object for temperature sensor
chtemp = MCP3008(channel=0, clock_pin=11, mosi_pin=10, miso_pin=9, select_pin=8)

# Assigning some parameters
tsample = 0.5  # Sampling period for code execution (s)
tdisp = 1  # Sampling period for value display (s)
tstop = 20  # Total execution time (s)
vref = 3.3  # Reference voltage for MCP3008
ktemp = 100  # Temperature sensor gain (degC/V)

# Initializing variables and starting main clock
tprev = 0
tcurr = 0
tstart = time.perf_counter()

# Execution loop
print('Running code for', tstop, 'seconds ...')
while tcurr <= tstop:
    # Pausing for `tsample`
    time.sleep(tsample)
    # Getting current time (s)
    tcurr = time.perf_counter() - tstart
    # Getting sensor normalized voltage output
    valuecurr = chtemp.value
    # Calculating temperature
    tempcurr = vref*ktemp*valuecurr
    # Displaying temperature every `tdisp` seconds
    if (np.floor(tcurr/tdisp) - np.floor(tprev/tdisp)) == 1:
        print("Temperature = {:d} deg C".format(int(np.round(tempcurr))))
    # Updating previous time value
    tprev = tcurr

print('Done.')
# Releasing GPIO pins
chtemp.close()

The next piece of code replaces the computer screen display with a 7-segment LED display. It’s a more interesting way to do both the input and output with a Raspberry Pi.

# Importing modules and classes
import time
import numpy as np
import tm1637
from gpiozero import MCP3008

# Creating 4-digit 7-segment display object
tm = tm1637.TM1637(clk=18, dio=17)
# Creating ADC channel object for temperature sensor
chtemp = MCP3008(channel=0, clock_pin=11, mosi_pin=10, miso_pin=9, select_pin=8)

# Assigning some parameters
tsample = 0.5  # Sampling period for code execution (s)
tdisp = 1  # Sampling period for value display (s)
tstop = 20  # Total execution time (s)
vref = 3.3  # Reference voltage for MCP3008
ktemp = 100  # Temperature sensor gain (degC/V)

# Initializing variables and starting main clock
tprev = 0
tcurr = 0
tstart = time.perf_counter()

# Execution loop
print('Running code for', tstop, 'seconds ...')
while tcurr <= tstop:
    # Pausing for `tsample`
    time.sleep(tsample)
    # Getting current time (s)
    tcurr = time.perf_counter() - tstart
    # Getting sensor normalized voltage output
    valuecurr = chtemp.value
    # Calculating temperature
    tempcurr = vref*ktemp*valuecurr
    # Displaying temperature every `tsample` seconds
    tm.temperature(int(np.round(tempcurr)))

print('Done.')
# Clearing display and releasing GPIO pins
tm.write([0, 0, 0, 0])
chtemp.close()

Temperature Sensor Accuracy

What about the accuracy of the LM35 sensor? Luckily enough I do have a LabJack T7 and an actual laboratory grade thermocouple (which has an accuracy of +/- 2 deg. C). At the time of this post, the temperature in my house was 21 deg. Celsius. Using the code above, the LM35 was reading 20 deg. C, while the thermocouple with the LabJack T7 was reading 21 deg. C.

The Python program below shows how to use the LabJack T7 for a simple temperature measurement. You can learn more about using Python to interact with a LabJack T7 here.

Unlike the thermocouple, the LM35 cannot be submerged in an ice bath (approx. 0 deg. C) or boiling water (approx. 100 deg. C), since that would clearly damage its electronic circuitry. Therefore I had to settle with the very unsophisticated measurement of the ambient temperature in my house to compare the two types of sensors.

# Importing modules and classes
import time
import numpy as np
from labjack_unified.devices import LabJackT7

# Creating LabJack object
ljt7 = LabJackT7()
# Assigning `K` type thermocouple to channel AIN0
ljt7.set_TC('AIN0', 'K')
# Assigning some parameters
tsample = 0.5  # Sampling period for code execution (s)
tdisp = 1  # Sampling period for value display (s)
tstop = 20  # Total execution time (s)

# Initializing variables and starting main clock
tprev = 0
tcurr = 0
tstart = time.perf_counter()

# Execution loop
print('Running code for', tstop, 'seconds ...')
while tcurr <= tstop:
    # Pausing for `tsample`
    time.sleep(tsample)
    # Getting current time (s)
    tcurr = time.perf_counter() - tstart
    # Getting current temperature
    tempcurr = ljt7.get_TCtemp()
    # Displaying temperature every `tdisp` seconds
    if (np.floor(tcurr/tdisp) - np.floor(tprev/tdisp)) == 1:
        print("Temperature = {:d} deg C".format(int(np.round(tempcurr))))
    # Updating previous time value
    tprev = tcurr

print('Done.')
# Closing LabJack object
ljt7.close()