
A two-axis joystick is an input device that can be used to simultaneously control two degrees of freedom of a system, such as roll and pitch on an aircraft, or the X and Y coordinates of a cartesian robot. The Keyestudio KS0008 joystick discussed in this post provides analog signals for the two axis (left-to-right and front-to-back), as well as a digital signal (downward). Like any analog input device used with the Raspberry Pi, the KS0008 requires the MCP3008 analog-to-digital converter chip.
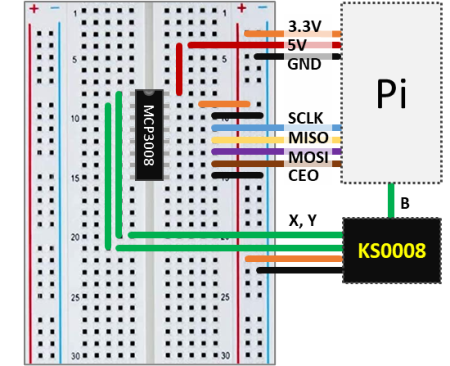

The wiring schematic shows how to connect the joystick to the Pi with the aid of the MCP3008. The analog outputs X and Y are wired to the channels 0 and 1 of the chip. The digital output B can be connected directly to any GPIO pin. In this configuration the KS0008 uses the 3.3V supply voltage. The Python code below samples and displays the three signals in an execution loop.
As a side note, I used the suffix LR (left-to-right) for the joystick’s X axis, and FB (front-to-back) for the Y axis. Mostly to avoid confusion with the digital filter input (X) and output (Y) used later in this post.
# Importing modules and classes
import time
import numpy as np
from gpiozero import MCP3008, DigitalInputDevice

# Creating objects for the joystick outputs
joyLR = MCP3008(channel=0, clock_pin=11, mosi_pin=10, miso_pin=9, select_pin=8)
joyFB = MCP3008(channel=1, clock_pin=11, mosi_pin=10, miso_pin=9, select_pin=8)
joyB = DigitalInputDevice(18)
# Assigning some parameters
tsample = 0.02  # Sampling period for code execution (s)
tdisp = 0.5  # Output display period (s)
tstop = 30  # Total execution time (s)
vref = 3.3  # Reference voltage for MCP3008

# Initializing variables and starting main clock
tprev = 0
tcurr = 0
tstart = time.perf_counter()
# Running execution loop
print('Running code for', tstop, 'seconds ...')
while tcurr <= tstop:
    # Getting current time (s)
    tcurr = time.perf_counter() - tstart
    # Doing I/O and computations every `tsample` seconds
    if (np.floor(tcurr/tsample) - np.floor(tprev/tsample)) == 1:
        # Getting joy stick normalized voltage output
        valLRcurr = joyLR.value
        valFBcurr = joyFB.value
        # Calculating current time raw voltages
        vLRcurr = vref*valLRcurr
        vFBcurr = vref*valFBcurr
        # Getting the Z axis state
        Bcurr = joyB.value
        # Displaying output voltages every `tdisp` seconds
        if (np.floor(tcurr/tdisp) - np.floor(tprev/tdisp)) == 1:
            print("X = {:0.2f} V , Y = {:0.2f} V , B = {:d}".
            format(vLRcurr, vFBcurr, Bcurr))
    # Updating previous time value
    tprev = tcurr

print('Done.')
# Releasing pins
joyLR.close()
joyFB.close()
joyB.close()
The interactive window output in VS Code should look something like what’s shown next. Note that the center position of the joystick outputs approximately half of the 3.3V supply voltage, i.e., 1.65V. Also observe the change in the B digital value as the joystick is pressed.
Running code for 30 seconds ...
X = 1.64 V , Y = 1.64 V , B = 0
X = 1.64 V , Y = 1.64 V , B = 0
X = 1.64 V , Y = 1.64 V , B = 0
X = 1.64 V , Y = 1.64 V , B = 0
X = 3.30 V , Y = 3.30 V , B = 0
X = 3.30 V , Y = 3.30 V , B = 0
X = 3.30 V , Y = 3.08 V , B = 0
X = 1.65 V , Y = 1.65 V , B = 0
X = 1.64 V , Y = 1.65 V , B = 1
X = 1.64 V , Y = 1.64 V , B = 1
X = 1.64 V , Y = 1.64 V , B = 0
X = 1.00 V , Y = 1.64 V , B = 0
X = 0.01 V , Y = 1.64 V , B = 0
X = 0.01 V , Y = 1.64 V , B = 0
X = 0.00 V , Y = 1.64 V , B = 0
X = 0.00 V , Y = 1.64 V , B = 0
X = 1.64 V , Y = 1.64 V , B = 0
X = 1.63 V , Y = 1.35 V , B = 0
X = 1.64 V , Y = 0.00 V , B = 1
X = 1.64 V , Y = 0.00 V , B = 1
X = 1.64 V , Y = 0.00 V , B = 1
X = 1.63 V , Y = 0.00 V , B = 1
X = 1.64 V , Y = 0.00 V , B = 0
X = 1.64 V , Y = 1.64 V , B = 0
...
X = 1.48 V , Y = 0.34 V , B = 0
X = 1.22 V , Y = 0.00 V , B = 0
X = 1.23 V , Y = 0.00 V , B = 0
Done.
Joystick Output Filtering
Eventually, the joystick output signal can be a bit jittery, due to the fact that not all of us are born with perfect control over our thumb motion.
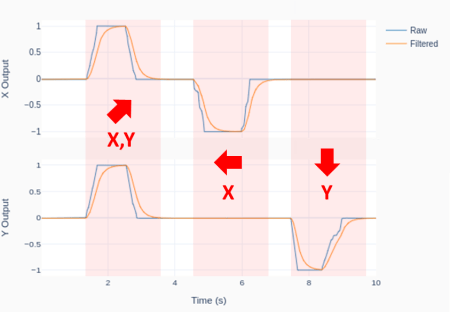
The plot was generated using the Python code below, where a digital low-pass filter with a cutoff frequency of 1Hz was applied to the joystick X and Y output signals. Of course, the cutoff frequency has to be adjusted based on the desired overall system response, which includes what the joystick is controlling.
The outputs were also normalized between -1 and 1. While any transfer function can be designed to map the original 0 to 3.3V range, -1 to 1 seems appropriate if a DC motor is being controlled between full speed reverse and full speed forward.
# Importing modules and classes
import time
import numpy as np
from utils import plot_line
from gpiozero import MCP3008

# Creating ADC channel objects for the joystick inputs
joyLR = MCP3008(channel=0, clock_pin=11, mosi_pin=10, miso_pin=9, select_pin=8)
joyFB = MCP3008(channel=1, clock_pin=11, mosi_pin=10, miso_pin=9, select_pin=8)
# Assigning some parameters
tsample = 0.02  # Sampling period for code execution (s)
tstop = 10  # Total execution time (s)
vref = 3.3  # Reference voltage for MCP3008
# Preallocating output arrays for plotting
t = []  # Time (s)
xLRn = []  # Joy stick X direction output (-1 to 1)
xFBn = []  # Joy stick Y direction output (-1 to 1)
yLRn = []  # Filtered X direction output (-1 to 1)
yFBn = []  # Filtered Y direction output (-1 to 1)

# First order digital low-pass filter parameters
fc = 1  # Filter cutoff frequency (Hz)
tau = 1/(2*np.pi*fc)  # Filter time constant (s)
# Filter difference equation coefficients
a1 = -tau/(tsample+tau)
b0 = tsample/(tsample+tau)
# Initializing filter values
xLR = [joyLR.value]  # x[n]
xFB = [joyFB.value]  # x[n]
yLR = xLR * 2  # y[n], y[n-1]
yFB = yLR * 2  # y[n], y[n-1]
time.sleep(tsample)

# Initializing variables and starting main clock
tprev = 0
tcurr = 0
tstart = time.perf_counter()
# Running execution loop
print('Running code for', tstop, 'seconds ...')
while tcurr <= tstop:
    # Getting current time (s)
    tcurr = time.perf_counter() - tstart
    # Doing I/O and computations every `tsample` seconds
    if (np.floor(tcurr/tsample) - np.floor(tprev/tsample)) == 1:
        # Getting joy stick normalized voltage output
        xLR[0] = joyLR.value
        xFB[0] = joyFB.value
        # Filtering signals
        yLR[0] = -a1*yLR[1] + b0*xLR[0]
        yFB[0] = -a1*yFB[1] + b0*xFB[0]
        # Updating output arrays with normalized output
        t.append(tcurr)
        xLRn.append(-1 + 2*xLR[0])
        xFBn.append(-1 + 2*xFB[0])
        yLRn.append(-1 + 2*yLR[0])
        yFBn.append(-1 + 2*yFB[0])
        # Updating previous filter output values
        yLR[1] = yLR[0]
        yFB[1] = yFB[0]
    # Updating previous time value
    tprev = tcurr

print('Done.')
# Releasing pins
joyLR.close()
joyFB.close()
# Plotting results
plot_line([t]*2, [xLRn, yLRn], yname='X Output', legend=['Raw', 'Filtered'])
plot_line([t]*2, [xFBn, yFBn], yname='Y Output', legend=['Raw', 'Filtered'])
A Note on Joystick Drift
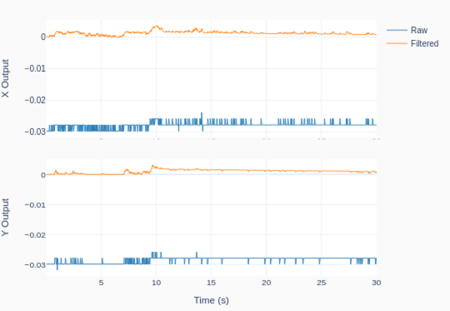
Even though the KS0008 that I used didn’t have a noticeable drift, it is possible that the output values at the “center position” can drift over time. This means that, over time, your system may start moving around, even when it’s supposed to be at rest at the joystick’s “center position”.
One way to address the issue is to use a digital band-pass filter, which attenuates both the low and high frequency content of a signal. Since the lower cutoff frequency will remove the DC component of the signal (the value that is held constant), it has to be chosen carefully depending on the application. If you are controlling an RC car (where there are extended periods of wide-open-throttle conditions), the band-pass filter may start attenuating the WOT value, causing the car to slow down! On the other hand, if you are controlling a drone, where zero-position drifts are highly undesirable, the band-pass filter may be what you need, since there are no extended periods of moving forward-backward or side-to-side.
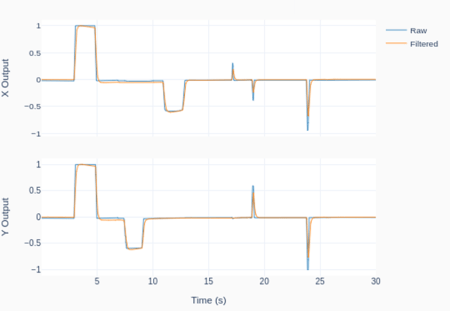
The following Python program implements a digital first-order band-pass filter for the joystick outputs, with low and high cutoff frequencies respectively of 0.005 and 2 Hz. The plots show the joystick’s X-Y motion traces for 30 seconds, as well as the “center-position” rest case. The latter helps illustrate how the DC component of the signal is almost fully removed.
# Importing modules and classes
import time
import numpy as np
from utils import plot_line
from gpiozero import MCP3008

# Creating ADC channel objects for the joystick inputs
joyLR = MCP3008(channel=0, clock_pin=11, mosi_pin=10, miso_pin=9, select_pin=8)
joyFB = MCP3008(channel=1, clock_pin=11, mosi_pin=10, miso_pin=9, select_pin=8)
# Assigning some parameters
tsample = 0.02  # Sampling period for code execution (s)
tstop = 30  # Total execution time (s)
vref = 3.3  # Reference voltage for MCP3008
# Preallocating output arrays for plotting
t = []  # Time (s)
xLRn = []  # Joy stick X direction output (-1 to 1)
xFBn = []  # Joy stick Y direction output (-1 to 1)
yLRn = []  # Filtered X direction output (-1 to 1)
yFBn = []  # Filtered Y direction output (-1 to 1)

# First order digital band-pass filter parameters
fc = np.array([0.005, 2])  # Filter cutoff frequencies (Hz)
tau = 1/(2*np.pi*fc)  # Filter time constants (s)
# Filter difference equation coefficients
a0 = tau[0]*tau[1]+(tau[0]+tau[1])*tsample+tsample**2
a1 = -(2*tau[0]*tau[1]+(tau[0]+tau[1])*tsample)
a2 = tau[0]*tau[1]
b0 = tau[0]*tsample
b1 = -tau[0]*tsample
# Assigning normalized coefficients
a = np.array([1, a1/a0, a2/a0])
b = np.array([b0/a0, b1/a0])
# Initializing filter values
xLR = [joyLR.value] * len(b)  # x[n], x[n-1]
xFB = [joyFB.value] * len(b)  # x[n], x[n-1]
yLR = [0] * len(a)  # y[n], y[n-1], y[n-2]
yFB = [0] * len(a)  # y[n], y[n-1], y[n-2]
time.sleep(tsample)

# Initializing variables and starting main clock
tprev = 0
tcurr = 0
tstart = time.perf_counter()
# Running execution loop
print('Running code for', tstop, 'seconds ...')
while tcurr <= tstop:
    # Getting current time (s)
    tcurr = time.perf_counter() - tstart
    # Doing I/O and computations every `tsample` seconds
    if (np.floor(tcurr/tsample) - np.floor(tprev/tsample)) == 1:
        # Getting joy stick normalized voltage output
        xLR[0] = joyLR.value
        xFB[0] = joyFB.value
        # Filtering signals
        yLR[0] = -np.sum(a[1::]*yLR[1::]) + np.sum(b*xLR)
        yFB[0] = -np.sum(a[1::]*yFB[1::]) + np.sum(b*xFB)
        # Updating output arrays with normalized output
        # (The filtered values have no DC component)
        t.append(tcurr)
        xLRn.append(-1 + 2*xLR[0])
        xFBn.append(-1 + 2*xFB[0])
        yLRn.append(2*yLR[0])
        yFBn.append(2*yFB[0])
        # Updating previous filter output values
        for i in range(len(a)-1, 0, -1):
            yLR[i] = yLR[i-1]
            yFB[i] = yFB[i-1]
        # Updating previous filter input values
        for i in range(len(b)-1, 0, -1):
            xLR[i] = xLR[i-1]
            xFB[i] = xFB[i-1]
    # Updating previous time value
    tprev = tcurr

print('Done.')
# Releasing pins
joyLR.close()
joyFB.close()
# Plotting results
plot_line([t]*2, [xLRn, yLRn], yname='X Output', legend=['Raw', 'Filtered'])
plot_line([t]*2, [xFBn, yFBn], yname='Y Output', legend=['Raw', 'Filtered'])

One thought on “Joystick with Raspberry Pi”