
An ultrasonic sensor can be used to detect the distance to an obstacle placed in front of it. The HC-SR04 sensor is an affordable option with fairly good accuracy for measurements between a couple of centimeters and a couple of meters. While primarily designed to work with an Arduino, this type of ultrasonic sensor can easily be used with a Raspberry Pi, provided some adjustments to the level of the signal voltage are made.
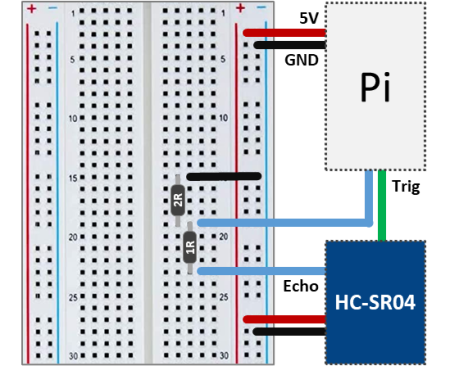
The wiring schematic above illustrates how to connect the ultrasonic sensor to the Pi. The HC-SR04 works with 5V for the supply voltage as well as for the logic signals Trig (emits ultrasonic sound wave) and Echo (detects reflected sound wave). Since the Raspberry Pi GPIO pins work with 3.3V logic signals, a voltage divider must be used. A 1:2 ratio of the resistors, as shown in the diagram, will do the trick. In my case I used 1 and 2 kΩ respectively. The Trig and (divided) Echo signals can then be connected to any Pi GPIO pins.
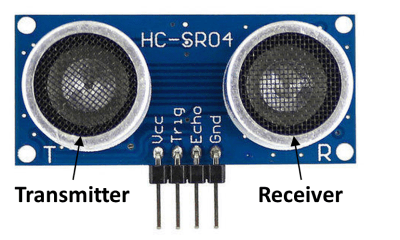
Operating principle of the HC-SR04
As mentioned earlier, this ultrasonic sensor has two logic pins that are used to detect the presence of an object:
- Trigger – When activated by a 10 μs pulse, it emits an 8-pulse train of ultrasonic sound (40 kHz). The 8-pulse pattern is designed to help the receiver better distinguish between the actual signal and ultrasonic ambient noise.
- Echo – Is used to detect the reflected 8-pulse signal. It transitions from a LOW to a HIGH state as soon as the 8-pulse train is emitted. It remains HIGH until a reflected signal is detected or 38 ms are elapsed (whichever occurs first).
The distance to the obstacle can be determined by measuring the time that the Echo pin remains HIGH, and by knowing that the speed of sound is 343 m/s (at 20 degrees Celsius). The three quantities are related through the equation below, which can be solved for distance. Note that since the sound wave travels to and from the detected obstacle before it gets to the sensor receiver, a factor of 2 appears in front of the distance.

Therefore:

Remember that the Echo signal remains high for about 38 ms. Hence, by using the formula above, an object that is more that about 6.5 m away cannot be accurately detected. In practical terms, the further away the obstacle is, the easier it is for the sensor to get confused with other reflections of the emitted ultrasonic pulse train. If the space that you are trying to navigate is full of hard surfaces at varying relative angles among them (such as a maze), there will be a lot of reflected signals coming from all over! You might stand a chance to be successful if the obstacles are no more than 0.5 m away.
Sensor Interface with Python
The code below shows a very simple class that represents the ultrasonic sensor. By inspecting the code, one should be able to identify the logic to generate the Trigger signal as well as the logic to determine the time that the Echo signal remains HIGH. The formula above is also implemented in the code to calculate the distance to an obstacle.
# Importing modules and classes
import time
from gpiozero import DigitalInputDevice, DigitalOutputDevice

# Defining sensor class
class UltraSonic:
    """
    Simple class that illustrates the ultrasonic sensor operating principle.

    """
    def __init__(self, echo, trigger):
        # Assingning ultrasonic sensor echo and trigger GPIO pins
        self._usoundecho = DigitalInputDevice(echo)
        self._usoundtrig = DigitalOutputDevice(trigger)
        # Assigning speed of sound (cm/s)
        self.speedofsound = 34300

    @property
    def distance(self):
        # Sending trigger pulse (~10 us)
        self._usoundtrig.on()
        time.sleep(0.000010)
        self._usoundtrig.off()
        # Detecting echo pulse start
        while self._usoundecho.value == 0:
            trise = time.perf_counter()
        # Detecting echo pulse end
        while self._usoundecho.value == 1:
            tfall = time.perf_counter()
        # Returning distance (cm)
        return 0.5 * (tfall-trise) * self.speedofsound

    @distance.setter
    def distance(self, _):
        print('"distance" is a read only attribute.')

    def __del__(self):
        self._usoundecho.close()
        self._usoundtrig.close()


# Assigning some parameters
tsample = 1  # Sampling period for code execution (s)
tstop = 10  # Total execution time (s)
# Creating ultrasonic sensor object
usensor = UltraSonic(echo=27, trigger=4)
# Initializing variable and starting main clock
tcurr = 0
tstart = time.perf_counter()

# Execution loop
print('Running code for', tstop, 'seconds ...')
while tcurr <= tstop:
    print('Waiting for sensor...')
    time.sleep(tsample)
    # Getting current time (s)
    tcurr = time.perf_counter() - tstart
    # Displaying measured distance
    print("Distance = {:0.1f} cm".format(usensor.distance))

print('Done.')
# Deleting sensor
del usensor
There is in fact a really good implementation of an ultrasonic sensor class in GPIO Zero. It uses multi-threading to give near instantaneous sensor distance measurements. Additionally, a moving average is used in the measurement calculation to improve the signal-to-noise ratio. The code below shows how simple it is to use the DistanceSensor class.
Observe that the execution portions of the two pieces of code are virtually the same, which illustrates the portability of classes inside a program. Finally, in the examples, I used the GPIO pins 4 and 27 for the Trigger and Echo signals, respectively.
# Importing modules and classes
import time
from gpiozero import DistanceSensor

# Assigning some parameters
tsample = 1  # Sampling period for code execution (s)
tstop = 10  # Total execution time (s)
# Creating ultrasonic sensor object
usensor = DistanceSensor(echo=27, trigger=4, max_distance=2)
# Initializing variable and starting main clock
tcurr = 0
tstart = time.perf_counter()

# Execution loop
print('Running code for', tstop, 'seconds ...')
while tcurr <= tstop:
    print('Waiting for sensor...')
    time.sleep(tsample)
    # Getting current time (s)
    tcurr = time.perf_counter() - tstart
    # Displaying measured distance (with unit conversion)
    print("Distance = {:0.1f} cm".format(100*usensor.distance))

print('Done.')
# Deleting sensor
del usensor
