Tag: Discrete PID

Motor Position Control with Raspberry Pi

Motor Position Control with Raspberry Pi

Along the lines of the Motor Speed Control post, let’s reuse some of our Python classes to control the angular position of a DC motor. We’ll also look into how to tune the PID using the Ziegler-Nichols method, as well as different ways to apply a position set point input.

Like before, the starting point is the Raspberry Pi setup that can handle both a PWM output and an encoder input. Unlike the speed control scenario, there’s no need to calculate and filter the speed from the measured angular position.

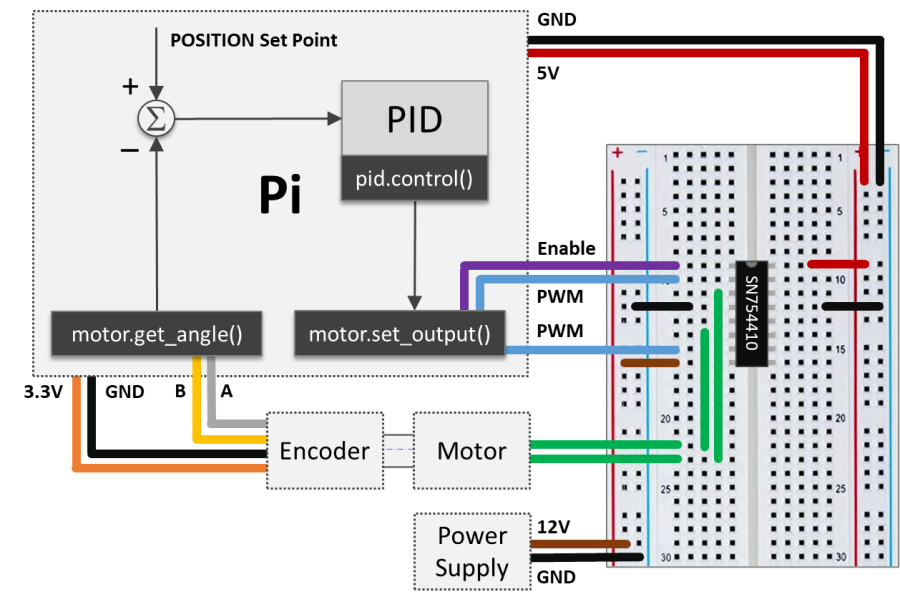
Most of the work presented in this post was done using the Python code below. It uses the Motor class and the Digital PID class as its building blocks. On my GitHub page, you can find the complete version of this program, a slight variation of it (used for the PID tuning), and all the classes that it uses.

# Importing modules and classes
import time
import numpy as np
from gpiozero_extended import Motor, PID

# Setting general parameters
tstop = 1  # Execution duration (s)
tsample = 0.01  # Sampling period (s)
thetamax = 180  # Motor position amplitude (deg)

# Setting motion parameters
# (Valid options: 'sin', 'cos')
option = 'cos'
if option == 'sin':
    T = 2*tstop  # Period of sine wave (s)
    theta0 = thetamax  # Reference angle
elif option == 'cos':
    T = tstop  # Period of cosine wave (s)
    theta0 = 0.5*thetamax  # Reference angle

# Creating PID controller object
kp = 0.036
ki = 0.379
kd = 0.0009
taupid = 0.01
pid = PID(tsample, kp, ki, kd, tau=taupid)

# Creating motor object using GPIO pins 16, 17, and 18
# (using SN754410 quadruple half-H driver chip)
# Integrated encoder on GPIO pins 24 and 25.
mymotor = Motor(
    enable1=16, pwm1=17, pwm2=18,
    encoder1=24, encoder2=25, encoderppr=300.8)
mymotor.reset_angle()

# Initializing variables and starting clock
thetaprev = 0
tprev = 0
tcurr = 0
tstart = time.perf_counter()

# Running execution loop
print('Running code for', tstop, 'seconds ...')
while tcurr <= tstop:
    # Pausing for `tsample` to give CPU time to process encoder signal
    time.sleep(tsample)
    # Getting current time (s)
    tcurr = time.perf_counter() - tstart
    # Getting motor shaft angular position
    thetacurr = mymotor.get_angle()
    # Calculating current set point angle
    if option == 'sin':
        thetaspcurr = theta0 * np.sin((2*np.pi/T) * tcurr)
    elif option == 'cos':
        thetaspcurr = theta0 * (1-np.cos((2*np.pi/T) * tcurr))
    # Calculating closed-loop output
    ucurr = pid.control(thetaspcurr, thetacurr)
    # Assigning motor output
    mymotor.set_output(ucurr)
    # Updating previous values
    thetaprev = thetacurr
    tprev = tcurr

print('Done.')
# Stopping motor and releasing GPIO pins
mymotor.set_output(0, brake=True)
del mymotor

PID Tuning using Ziegler-Nichols

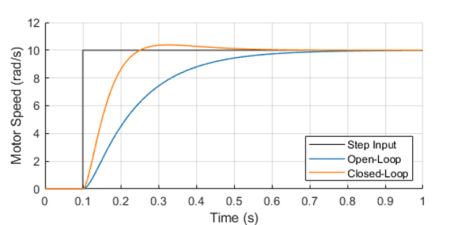
Unfortunately, the PID tuning method presented in the previous post cannot be used to obtain an initial set of controller gains. The first-order approximation used for the speed response doesn’t work for the angular position, since it increases linearly once a steady-state speed is reached. In other words, the DC motor system with position as an output is an integrator of the corresponding system with speed as an output.

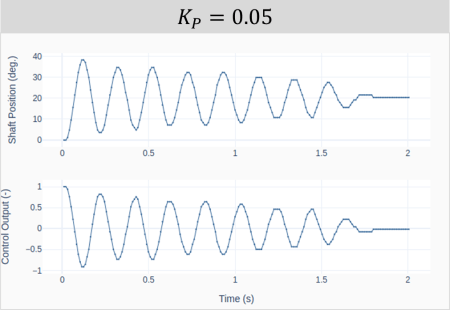
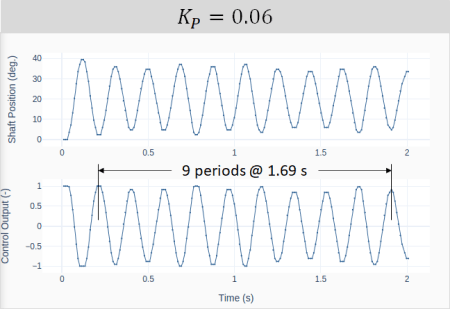
That brings us to the Ziegler-Nichols method, which can be used with a closed-loop system. In our case, the feedback loop is closed on the motor shaft position. The method is based on starting the tuning process only with a proportional gain and then increasing its value, until the closed-loop system becomes marginally stable. I.e., oscillates with a constant amplitude. The four plots below show the response and corresponding controller output for increasing values of.

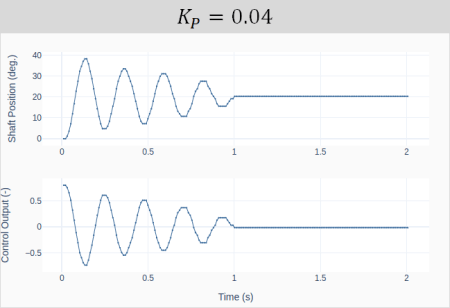
The first question that comes to mind is what should the starting value ofbe. A good guess is based on the size of the step input and the saturation limit of the controller. The very instant the step input is applied, the position error going into the controller is equal to the step size. Therefore, at that moment, the controller output is given by . As shown in the first plot, for , the initial controller output is 0.6 for a step input of 20 degrees. The choice of the step size and the initial proportional gain are such that the controller doesn’t saturate (in our case, 1 is the output limit) and there’s still room to increase the gain without running “too much” into the saturation zone.

The ultimate proportional gainis achieved when the system oscillates with a constant amplitude. In our example, . Under this condition, the ultimate oscillation period can be extracted from the last plot above and is calculated as.

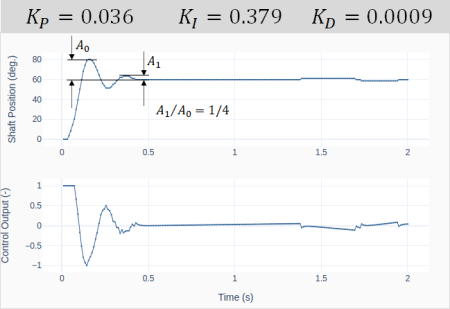
The Ziegler-Nichols method states that for a 1/4 decay ratio of the closed-loop system response, the PID gains are given by:

The graph shows the closed-loop response for a shaft position step input of 60 degrees. The PID gains were obtained after substitutingandinto the formulas above.

Observe the 1/4 decay ratio of the amplitude. Also, the fact that the motor position cannot meet exactly 60 degrees causes the integral error to build up, resulting in small position “jumps” around the 1.4 and 1.7 s marks.

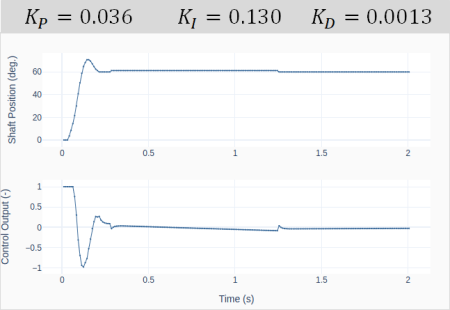
Starting from the gains defined by using the Ziegler-Nichols method, let’s do some manual tuning aiming to decrease the oscillation of the closed-loop response. That can be achieved by decreasing the integral gain and increasing the derivative gain.

The plot on the left shows the system response for values that were obtained after a few attempts. The idea is to later compare the effect of the two sets of gains on the response (when applying different types of position set point inputs).

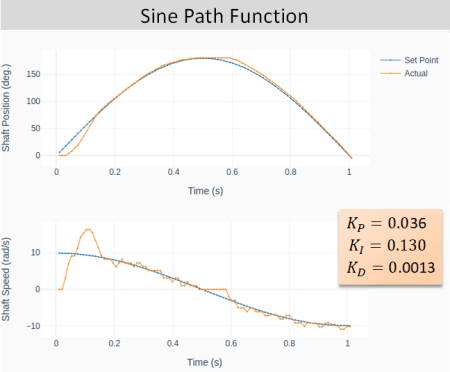
Sine and Cosine Path Functions

While using step changes to move from one position to another is fine, there are situations where we want the position to follow a pre-determined path. By choosing the right combination of PID gains and characteristics of the path function, it’s possible to greatly improve the tracking ability of the position controller.

In this post let’s take a look at two trigonometric functions (sine and cosine), that can be used to move the motor to a given set point angle and then back to its initial position. By inspecting the code above, we can identify the sine and cosine path functions shown below.

and

By choosing suitable values of the amplitudeand period, the two functions can produce motion paths that have the same set point (maximum) angle and the same motion duration to return to the original angular position.

The next two plots show the general closed-loop tracking performance for the sine-based path function, using the two sets of PID gains obtained in the previous section. Notice the more pronounced oscillatory behavior for the more aggressive set of gains. Additionally, due to the nature of the sine-based path, the initial and final speeds are not zero.

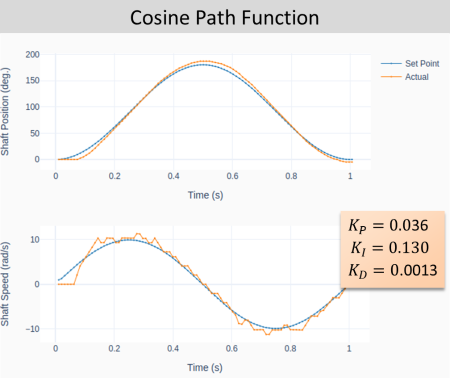
The cosine-based path function on the other hand (shown below) has zero initial and final speeds. That characteristic can greatly reduce the system oscillation, especially at the very beginning of the motion.

Final Remarks

When it comes to position control, the DC motor is usually part of a machine or even a robot, where it is important to understand the dynamic behavior of the complete system. Speed and accuracy are usually conflicting goals that have to be compromised to obtain the best performance of the closed-loop control system. However, having a suitable path function can minimize undesired system oscillation caused by the input excitation (or path).

In future posts we will take a deeper look into path functions, particularly the ones that in addition to having zero end-point speeds also have zero end-point accelerations. Stay tuned!

Digital PID Controller

Digital PID Controller

Closed-Loop PID (Proportional Integral Derivative) controllers are quite popular when it comes to regulating a dynamic system that has to follow a desired set point. When compared to other types of controllers, it has the advantage of requiring little to no knowledge about the system plant for it to be designed successfully.

Before we start, the idea of this post isn’t to go over the theory of control systems. The goal is to talk about some of the characteristics of a PID controller and how to go about implementing a discrete (or digital) one with some additional features to make it more robust. In the end, we will have a Python class that represents a PID, which can be used in an execution loop to control a process or a dynamic system.

The diagram below illustrates a closed-loop system, where all the signals are represented in the time domain. The three terms of the PID are shown separately, where the controller output valueis the sum of the individual term contributions. The regulation of the plant outputto the desired set point valueis achieved as the controller continuously brings the errorbetween the set point and the plant output to zero.

The PID gains,andcan be tuned so that the closed-loop dynamic behavior ofmeets the desired response requirements. In broad terms, the proportional term reacts directly to the current value of the error between set point and desired output. Usually, the proportional term by itself cannot bring the error to zero (since it relies on the existence of an error to produce a controller output). That’s where the integral term comes into the picture: because it takes into account the accumulated error (or the integrated error) it will compensate the smallest deviations. Over time the accumulation of the deviation will be large enough to cause a controller output. The proportional and integral terms combined can bring the error to zero (for a steady state input) for most dynamic systems.

The derivative term reacts to the rate of change of the error and can be effective for sudden set point changes, by helping reduce the response overshoot. In practical applications, using a derivative term can be tricky due to its sensitivity to noise that’s typically present in the measurement of the plant output.

As a side note, the plots throughout this post were generated using MATLAB and Simulink, where the corresponding m-files and Simulink model can be found on my GitHub page. I should emphasize that I did spend some time exploring and trying to use the Python Control Systems package. However, nothing can beat Simulink when it comes to quickly representing and simulating dynamic systems. Especially when non-linearities are being modelled. Spending $100 on that MATLAB student license might be something to think about.

One way to analyze the performance of a control system (in our case a PID controller) is by measuring the closed-loop system’s response to a step change of the set point.

Because in future posts we will be doing closed loop control of small low-budget DC motors, let’s use as a plant a somewhat fictitious motor with an integral gear box. The plot shows the closed-loop system response in contrast with the open-loop response.

The controller output (armature voltage), as well as the individual contribution of each of the PID terms, is also shown. Observe how the proportional and derivative terms go to zero as the response approaches its steady-state value, leaving the integral term in charge of keeping the errorat zero.

It’s important to mention that both the open-loop as well as the closed-loop responses end up at the same final armature voltage of 2.8 V.

For our DC motor model, the armature voltage required to produce a motor speed output of 10 rad/s without any external load is 2.8 V. In the case of the open-loop system, I use that knowledge to apply a step input of 2.8 V to the motor. On the other hand, the step input to the closed-loop system is in fact the desired speed output of 10 rad/s. The PID controller will apply whatever armature voltage is needed to follow the speed set point, even when the manufacturing variability of the motor or other sources of error are present. That’s the first takeaway that most people working with control systems are very familiar with. The second point I want to make is that the improved response time, compared to the open-loop system, can only be achieved because the controller has an excess output capability (up to 12 V in our motor model) that can be tapped into at the moment of the step change.

Without getting into stability margins, the closed-loop system can be just as fast as you want. The issue at hand becomes how much do you want to “oversize” your system so it can obtain that stellar dynamic response. Understanding you engineering requirements is key when choosing the right hardware “size” for the desired closed-loop system behavior.

Discrete PID Implementation

The most basic digital PID implementation can be obtained from taking the derivative of the controller output equation

and using backward difference (with sampling period) to approximate the derivatives. The difference equation below can be obtained by following the steps shown here.

This implementation has two notable advantages:

  • Because the previous output value is taken into account for the output calculation, the controller can be seamlessly started from an open-loop condition by assigning the current open-loop output value to the very first .
  • The PID gains,andobtained from the design of a continuous controller are still valid in its discrete representation (provided a fast enough sampling periodis used).

The graphs below show the closed-loop response of the analog plant (DC motor) as well as the corresponding output of the discrete controller for a sampling period of 0.01 and 0.005 seconds. The equivalent analog controller using the same PID gains is also shown as a reference. Although not on the graphs, the discrete PID with a sampling period of 0.001 seconds produces virtually the same response as the continuous one.

As it can be seen in the graphs, the lower sampling period caused the plant output to oscillate. Further increasingwould increase the amplitude of the oscillations, eventually making the system unstable. This well known behavior is caused by the discretization of the controller, where the plant basically behaves in an open loop fashion in between sample points. Even though this problem can be approached mathematically, tackling it using a simulation tool can provide valuable insight on the compromises between sampling period and PID gains, during the initial design of the controller.

Before we put our digital PID into a Python class, let’s go over a few features that can make the controller more robust for practical applications.

Saturation and Anti-Windup

If we were to use some very aggressive gains for our motor PID controller, the step response could be further improved as shown with the solid trace below. You’ll also notice an unpractical armature voltage spike over 60 V! In reality, the controller output will saturate at its maximum (or minimum) output capability, in our case 12 V, producing the dotted line traces instead.

Once the controller output is saturated, the integral term compensation keeps increasing in an attempt to reduce the accumulated error. By the time the controller “comes back” from the saturation state, the integral term is “wound-up”, resulting in an overshoot of the response, as it can be seen by contrasting the dotted and solid orange lines above.

By implementing anti-windup logic in the discrete controller, the overshoot caused by potential saturation can be reduced, as shown on the left.

The basic idea is to turn off the integral term of the PID (as we’ll see in the Python class at the end) every time an upper or lower saturation limit is exceeded. This is a common improvement used in digital PID controllers.

Feed-Forward and Derivative Term Filtering

Another useful improvement that can be made to our digital PID is to allow for a feed-forward signalin its implementation. The feed-forward term reduces the contribution of the controller output signal , making the system less susceptible to noise in the measurement of the plant output used to calculate the error.

While not always possible, in some special situations, we can pre-calculate the feed-forward signal as a function of time and add it to controller output as shown in the block diagram. Typical applications involve a known “control path” such as a robotic manipulator (with pre-programmed motion paths) or a vehicle’s cruise control (on a highway with known topology).

As I mentioned earlier in this post, the derivative term of the PID is quite sensitive to noise in the calculated error signal, which primarily comes from the transducers used to measure the plant output. One way to help mitigate this effect is the addition of a low-pass filter to the output of the derivative term inside the controller. Let’s use my favorite first-order digital filter, given by the difference equation below, whereis the derivative term output andis the corresponding filtered output signal.

PID Python Class

Finally, it’s time to put it all together inside a Python class. If you go through the code below, you’ll be able to identify all the components that were discussed in the previous three sections. The PID class should be instantiated before entering the execution loop, while the control method is called every time step inside the execution loop. In my next post we will use this class to control the speed of a small DC motor.

class PID:
    def __init__(self, Ts, kp, ki, kd, umax=1, umin=-1, tau=0):
        #
        self._Ts = Ts  # Sampling period (s)
        self._kp = kp  # Proportional gain
        self._ki = ki  # Integral gain
        self._kd = kd  # Derivative gain
        self._umax = umax  # Upper output saturation limit
        self._umin = umin  # Lower output saturation limit
        self._tau = tau  # Derivative term filter time constant (s)
        #
        self._eprev = [0, 0]  # Previous errors e[n-1], e[n-2]
        self._uprev = 0  # Previous controller output u[n-1]
        self._udfiltprev = 0  # Previous derivative term filtered value

    def control(self, ysp, y, uff=0):
        #
        # Calculating error e[n]
        e = ysp - y
        # Calculating proportional term
        up = self._kp * (e - self._eprev[0])
        # Calculating integral term (with anti-windup)
        ui = self._ki*self._Ts * e
        if (self._uprev+uff >= self._umax) or (self._uprev+uff <= self._umin):
            ui = 0
        # Calculating derivative term
        ud = self._kd/self._Ts * (e - 2*self._eprev[0] + self._eprev[1])
        # Filtering derivative term
        udfilt = (
            self._tau/(self._tau+self._Ts)*self._udfiltprev +
            self._Ts/(self._tau+self._Ts)*ud
        )
        # Calculating PID controller output u[n]
        u = self._uprev + up + ui + udfilt + uff
        # Updating previous time step errors e[n-1], e[n-2]
        self._eprev[1] = self._eprev[0]
        self._eprev[0] = e
        # Updating previous time step output value u[n-1]
        self._uprev = u - uff
        # Updating previous time step derivative term filtered value
        self._udfiltprev = udfilt
        # Limiting output (just to be safe)
        if u < self._umin:
            u = self._umin
        elif u > self._umax:
            u = self._umax
        # Returning controller output at current time step
        return u