Creating a class to represent a Raspberry Pi digital-to-analog converter is a good example on how to put together the concepts we have been exploring in some of the previous posts. More specifically, DAC with Raspberry Pi and Classes vs. Functions in Python. Besides a Raspberry Pi and a couple of resistors and capacitors, we need an additional DAQ device to calibrate our Pi DAC output.
In the post DAC with Raspberry Pi, we used an MCP3008 to measure (and calibrate) the DAC output. This time around I will follow my recommendation of not using the same DAQ to generate and measure the output, using instead a LabJack U3. While a LabJack is not a calibration DAQ device, it is far more accurate than a Pi, therefore moving us in the right direction when it comes to choosing a calibration device.
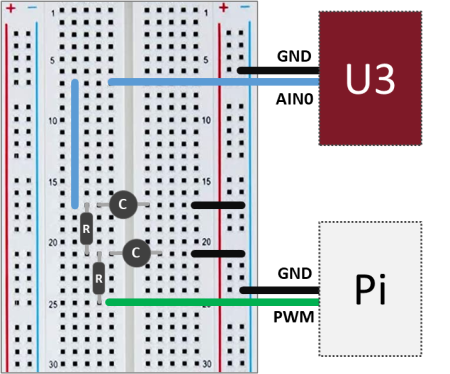
The setup is quite simple: On the Pi side, a GPIO pin used as PWM input to the the low-pass filter and a GND pin. On the U3 side, the RC filter output (which is our DAC output) is connected to the analog input port AIN0, while the GND port is connected to the same GND as the Pi.
The U3 is connected to a separate computer via USB and will be running a variation of the code that can be found on my GitHub page. The Python package that I made containing the LabJack U3 class can be installed from the PyPI (Python Package Index) page.
As before, the cascaded second order filter is made of two first order low-pass RC filters, where R = 1 kΩ and C = 10 μF.
Of course, if you don’t have a LabJack, a digital multimeter should do the trick and allow you to measure the DAC output in order to do its calibration. I chose to use a LabJack to gain some insight on the DAC output signal by using its 50 kHz streaming capability (and because an oscilloscope is not among my few possessions).
The next step is to layout what our DAC class should look like. You may want to put down a “skeleton” of the class, as shown below, with a brief description of what the attributes are and what the methods do. Using the reserved word pass allows for placeholders for the methods to be easily created and filled out later.
class DAC:

    def __init__(self):
        # Class constructor
        self._vref = 3.3  # Reference voltage output
        self._slope = 1  # Output transfer function slope
        self._offset = 0  # Output transfer function intercept

    def __del__(self):
        # Class destructor
        # - makes sure GPIO pins are released
        pass

    def reset_calibration(self):
        # Resets the DAC slope and offset values
        pass

    def set_calibratio(self):
        # Sets the DAC slope and offset with calibration data
        pass

    def get_calibration(self):
        # Retrieves current slope and offset values
        pass

    def set_output(self):
        # Sets the DAC output voltage to the desired value
        pass
One of the nice things about using classes is that it’s easy to add (or remove) attributes and methods as you code away. And even better, if you’re using the interactive session of VS Code, saved updates to your methods are immediately reflected in any instance of the class that is present in the session’s “workspace” (to use a MATLAB term, for those familiar with it). In other words, if you were to call that method again using dot notation, it would behave based on the latest modifications that you saved.
In the case of our example, the attributes need to hold the values of a reference voltage (Pi’s 3.3 V if you’re not using any OpAmp with your filter) and the calibration parameters which are used so the DAC can output the correct set voltage value.
from gpiozero import PWMOutputDevice


class DAC:

    def __init__(self, dacpin=12):

        # Checking for valid hardware PWM pins
        if dacpin not in [12, 13, 18, 19]:
            raise Exception('Valid GPIO pin is: 12, 13, 18, or 19')
        # Assigning attributes
        self._vref = 3.3  # Reference voltage output
        self._slope = 1  # Output transfer function slope
        self._offset = 0  # Output transfer function intercept
        # Creating PWM pin object
        self._dac = PWMOutputDevice(dacpin, frequency=700)

    def __del__(self):

        # Releasing GPIO pin
        self._dac.close()

    def reset_calibration(self):
        self._slope = 1
        self._offset = 0

    def set_calibration(self, slope, offset):
        self._slope = slope
        self._offset = offset

    def get_calibration(self):
        print('Slope = {:0.4f} , Offset = {:0.4f}'.format(
            self._slope, self._offset))

    def set_output(self, value):

        # Limiting output
        output = self._slope*value/self._vref + self._offset
        if output > 1:
            output = 1
        if output < 0:
            output = 0
        # Applying output to GPIO pin
        self._dac.value = output
As far as the methods are concerned, a constructor and a destructor, being the latter a good idea so the GPIO pin can be released once you’re done using the class instance. Also, a group of methods to deal with the DAC calibration and a single method to set the DAC output value. Notice that the attribute names start with an underscore. That’s a loose Python convention to define private properties (or methods, if I were to use the underscore as the first character of the method name), unlike other programming languages which are more rigorous about it by making you explicitly define what’s private. The general idea of private properties (or methods) is that they’re not supposed to be accessible directly by the user of the program, therefore, being accessed internally by the code.
DAC Calibration
First, we create an instance of the DAC class on GPIO pin 18: mydac = DAC(dacpin=18)
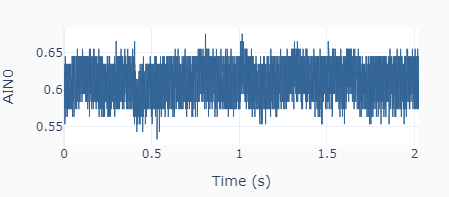
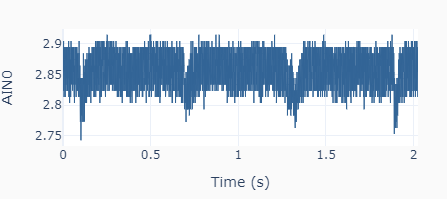
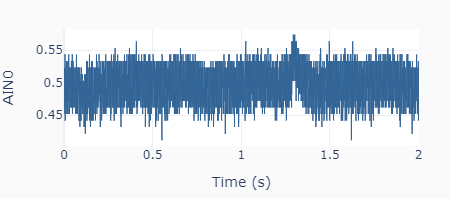
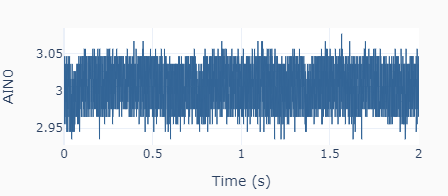
Then, the output calibration is done with two output settings (0.5 and 3.0 V) using the method: mydac.set_output(0.5) and mydac.set_output(3.0). Each time the output is read using the streaming feature of the LabJack U3, as shown on the left. The high frequency noise in the signal is quite apparent and is a most likely due to the limitations of the Raspberry Pi hardware. For the two desired outputs of 0.5 and 3.0 V, the corresponding mean actual values are 0.614 and 2.854 V. Because the system response is linear, two data points are sufficient.
The slope and offset are calculated as slope = (3.0 – 0.5) / (2.854 – 0.614) = 1.116, and offset = 0.5 – (3.0 – 0.5) / (2.854 – 0.614) x 0.614 = -0.185. The calibrated values are applied to the DAC instance using the method mydac.set_calibration(1.116, -0.185). If a new calibration has to be done, the default values of 1 and 0 can be restored by using the method mydac.reset_calibration(). As mentioned earlier, the private attributes _slope and _offset are not dealt with directly by the user but instead through different methods. Of course, in this simple example, they could be changed directly by doing mydac._slope = 1.116 and mydac._offset = -0.185. In more complex situations there might be a few good reasons to avoid direct access to an instance’s attributes.
With the calibrated DAC, the new outputs to the same settings as before (0.5 and 3.0 V) give the results on the left, where the actual mean values are 0.493 and 3.006 V, respectively.
DAC Test
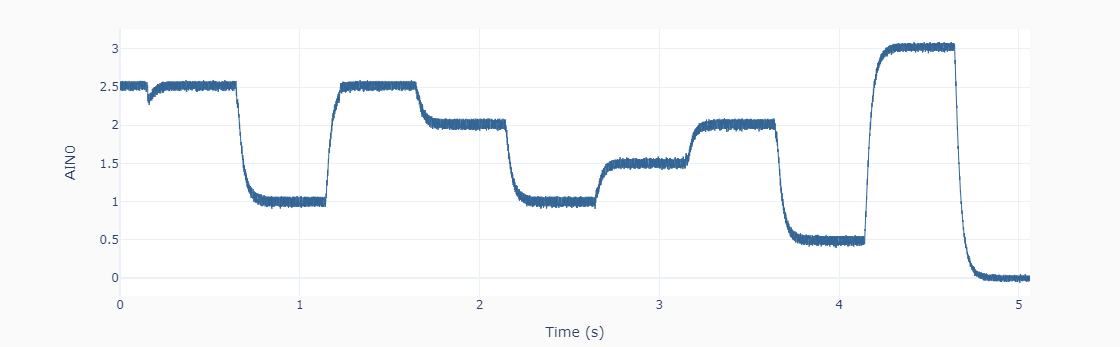
Let’s put the DAC device to the test! The Python code below can be used to generate a random sequence of steps every 0.5 seconds between 0 and 3 V (every 0.5 V). The data is collected using the LabJack U3 streaming feature and plotted in the next figure. Not too bad for our poor man’s DAC.
import time
import numpy as np
from gpiozero_extended import DAC

# Assigning parameter values
tstep = 0.5  # Interval between step changes (s)
tstop = 10  # Total execution time (s)

# Creating DAC object on GPIO pin 18
mydac = DAC(dacpin=18)
mydac.set_calibration(1.116, -0.185)

# Initializing timers and starting main clock
tprev = 0
tcurr = 0
tstart = time.perf_counter()

# Running execution loop
print('Running code for', tstop, 'seconds ...')
while tcurr <= tstop:
    # Updating analog output every `tstep` seconds with
    # random voltages between 0 and 3 V every 0.5 V
    if (np.floor(tcurr/tstep) - np.floor(tprev/tstep)) == 1:
        mydac.set_output(np.round(6*np.random.rand())/2)
    # Updating previous time and getting new current time (s)
    tprev = tcurr
    tcurr = time.perf_counter() - tstart

print('Done.')
# Releasing pin
del mydac